-2.png?width=1080&height=1080&name=Untitled%20design%20(5)-2.png "bemo logo")


Note: This article was last reviewed in November 2022. We do our best to keep all of our blogs up to date to offer the best, most accurate guidance possible. If you notice something missing, please drop a comment so we can update this article. Thank you!
Nothing is worse than waiting for your email to s…l…o…w…l…y load, especially when you’re on the go or working hard to meet a tight deadline.
Whether you’re tired of watching that dreaded email update icon load or you’re always the last one to get a real-time update, you may need to rethink how your computer uses Outlook’s email cache.
Originally designed to help Outlook users have a smooth, responsive email experience, the Outlook cache may actually be the root cause of your snail-like email.
So, what is Outlook cache, how can it be slowing down your day, and—most importantly—what can you do about it?
Let’s dive in!
What is an email cache?
The concept of a cache is not just for email; it is a feature operating systems use to help streamline users’ experiences by temporarily storing files locally on a device for an application to access more quickly.
The same applies to your Microsoft Outlook client on your local computer.
Sounds great, right?
Well, like anything in life, there can be too much of a good thing, and the same applies to cached files.
For example, if you've noticed a slowdown in your Outlook client’s performance or if old data comes up as suggestions from Outlook AutoComplete when performing searches of your mailbox or when typing in addresses when composing an email, it might mean that the amount of cache stored on your local computer is getting to be too large.
If that’s the case, then it is time to do some cache cleanup.
How do you delete your Outlook cache?
The steps to delete the Outlook cache are surprisingly easy and can be performed at two different levels depending on your preferences:
- Just your email cache
- Your Outlook AutoComplete cache
- Both your email cache and Autocomplete cache
Whichever you choose, just remember that cleaning up your cache will not delete emails, contacts, or other useful information.
Ready to get started? Then follow these steps if you are using Outlook 2019, 2016, 2013, 2010, 2007, or Outlook for Office 365:
-
Save any work and close Outlook.
-
Press Windows key+R. This will open the Run dialog box.
-
In the Run dialog box, enter %localappdata%\Microsoft\Outlook and press Enter.
-
Double-click the RoamCache folder to view the cache files.
:max_bytes(150000):strip_icc():format(webp)/delete-outlooks-add-cache-file-1173820-2-8fbca3c0a8a748bbb6ec9e75e4e1d295.png)
Back up the cache files so that you can restore the files if something goes wrong.
-
To delete the cache files, press and hold the Shift key while selecting all of the files. Then press the Delete key, or right-click the highlighted files and select Delete.
:max_bytes(150000):strip_icc():format(webp)/delete-outlooks-add-cache-file-1173820-3-6784d703bd4c482ebd0bd3a3b0e91f68.png)
Note: Once you open the Outlook application again, new cache files will appear in the RoamCache folder.
Need help? Click the chat in the lower right-hand corner of your screen.
How do you clear your Outlook AutoComplete cache?
If you want to clear your Outlook AutoComplete cache – where Microsoft prompts you with suggestions to complete your entry – you have two options:
- Turn off auto-complete so the cached data doesn't display, or
- Delete the auto-complete cache completely.
Adjusting Your Outlook AutoComplete Settings
-
Go to the File tab and choose Options.
:max_bytes(150000):strip_icc():format(webp)/delete-outlooks-add-cache-file-1173820-4-25d725fdaf2646f2a928e3772cccb1ce.png)
-
In the Outlook Options dialog box, select the Mail tab.
-
In the Send messages section, clear the Use Auto-Complete List to suggest names when typing in the To, Cc, and Bcc lines.
:max_bytes(150000):strip_icc():format(webp)/delete-outlooks-add-cache-file-1173820-5-c84de11117644195ad23589f3a217947.png)
-
If you want to clear the auto-complete cache, select Empty Auto-Complete List. In the confirmation dialog box, select Yes.
Clear the cache to remove the auto-complete history without disabling the auto-complete feature in Outlook.
:max_bytes(150000):strip_icc():format(webp)/delete-outlooks-add-cache-file-1173820-6-1405f57686ae46d68254efad9fbd6616.png)
In the Outlook Options dialog box, select OK.
That's it! That wasn't so bad, was it?
Loving using Office 365? Consider using Microsoft 365 instead. Read our blog 👉Microsoft 365 vs. Office 365 to learn why.

How do you clear your AutoComplete cache in the Outlook web application?
If you are using Outlook’s web application to check your email, you can clear your Outlook AutoComplete cache there, too.
- Open a new email, and start to type the email address or contact name you would like to delete.
- When the email address you want to delete appears in the list, mouse over the address you would like to delete. Click the X button to delete the address.
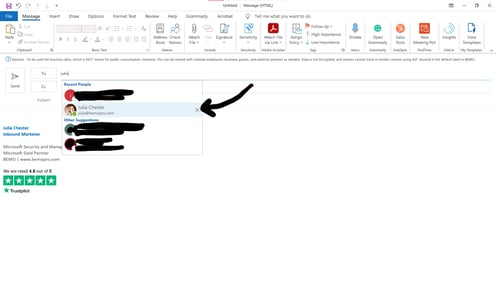
Boom! Done.
Find more answers to your Microsoft questions.
After performing these steps, your Outlook application should be squeaky clean, and your experience with it should be much quicker.
Have more questions on how to best utilize your Microsoft applications or want to stay on top of the latest best practices and tips to boost your productivity? Then make sure to subscribe to the BEMO blog.
Tired of email altogether? We get it. There's a solution: Microsoft Teams. Read more about it here.

Questions? Comments? Leave yours below 👇
Sign up & receive BEMO content right to your inbox.

Leave us a comment!