Difficulty Level: Intermediate | Time Investment: 1.5-2 hours
Summary: It's easy for SMBs to start with Google's suite of tools but eventually find themselves needing more robust features and better integration that Microsoft 365 offers. This guide will walk you through the essential steps to migrate your existing Google account to Microsoft 365, helping your business leverage advanced collaboration tools, enhanced security, and improved productivity to reach new heights.
Most people that come to us to migrate their email to Office 365 are under the impression that it's a really easy process. You have no idea how many times I've heard, "you're just copying and pasting a bunch of .pst files". When in reality, There are a lot of steps that require your attention to detail and time.
So we're publishing our step-by-step guide for migrating Gmail to Office 365 to show you how to do it yourself!
Table of Contents
- Video Walkthrough
- Preparation
- Migrate Gmail to Office 365 (15 main steps with several substeps)
- Post-migration (4 main steps with some substeps)
Video Walkthrough
For those of you who prefer a more guided approach, watch us take you through every step of this guide where we explain each step in detail.

Step by Step Guide
Stage 1: Preparation
Before undergoing the migration process itself, you need to have a game plan ready to avoid any surprises along the way. Answer the following questions to have a good starting point:
-
- What email service are you currently using?
- Who is your DNS provider, who is the admin to the account, and what are the credentials?
- How many inboxes are there?
- What items do you want to migrate? Just the emails? Contacts? Calendar items?
- Do you have any shared inboxes?
- How many domains do you have?
- How many email aliases are there?
- How large (GBs) are each of the mail boxes?
Stage 2: Migrate Gmail to Office 365
Step 1 -Validate that Google MFA and "allow access to less secure apps" are turned off
- For every user, connect to their Gmail account via https://www.google.com/gmail/
- Once connected, click on Account (top right corner) and click Google Account
- Click on Security

- Make sure that "Use your phone to sign in" and "2-Step Verification" are both turn off

- Make sure that Less secure app access is turned Off
Step 2 - Add users in Office 365
- To add users in Office 365 and create mailboxes, apply Exchange Online licenses. These licenses can come from a standalone plan or a subscription that includes Exchange Online.
You must link G Suite mailboxes to new user mailboxes in Office 365. Data will then move to the correct mailboxes in Office 365.
Step 3 - Create a list of Gmail (S Suite) mailboxes to migrate to Office 365
- Create a CSV file in Excel to list all the users to migrate to Office 365.
- If the users in Gmail (G Suite) have 2-step verification enabled on their accounts, then you need to know the app password of each Gmail mailbox that you want to migrate. If 2-step verification is turned-off on Gmail accounts, then you need normal user account passwords for the users in Gmail.
- It is not mandatory to migrate all Gmail mailboxes at once. You can migrate them in batches at your convenience. You can include up to 50,000 mailboxes (one row for each user) in your migration file. The file can be as large as 10 MB.
- Use the following screenshot as a template to create the migration file in Excel. Start with the headings in row 1. Make sure they match the picture exactly and don't contain spaces. The exact heading names are:
- EmailAddress in cell A1.
- UserName in cell B1.
- Password in cell C1.

- Next enter the email address, username, and app password (user account password) for each mailbox you want to migrate. Enter one mailbox per row.
- Column A is the email address of the Office 365 mailbox. This is what's shown in the username column in Users > Active users in the Office 365 admin center.
- Column B is the sign-in name for the user's Gmail mailbox—for example, alberta@contoso.com.
- Column C is the app password for the user's Gmail mailbox. Creating the app password is described in Migration from G Suite mailboxes using the Office 365 admin center.

- Save the file as a CSV file type, and then close Excel.

Step 4 - Connect Office 365 to Gmail (G Suite) by creating Migration Endpoint in Exchange Admin Center
- Login to Exchange Admin Center https://outlook.office365.com/ecp with Global Administrator account
- Go to Recipients > Migration > More… > Migration Endpoints.

- Click New + to create a new migration endpoint.

- On the Select the migration endpoint type page, choose IMAP, and click Next.
- On the IMAP migration configuration page, set IMAP server to imap.gmail.com and keep the default settings the same. (Authentication – Basic, Encryption – SSL, Port – 993).
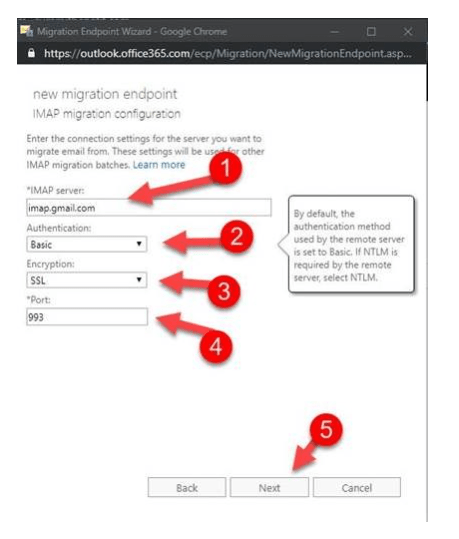
- Click Next. The migration service uses the settings to test the connection to Gmail system. If the connection works, the Enter general information page opens.
- On the Enter general information page, type a Migration endpoint name, for example, Test5-endpoint. Leave the other two boxes blank to use the default values.
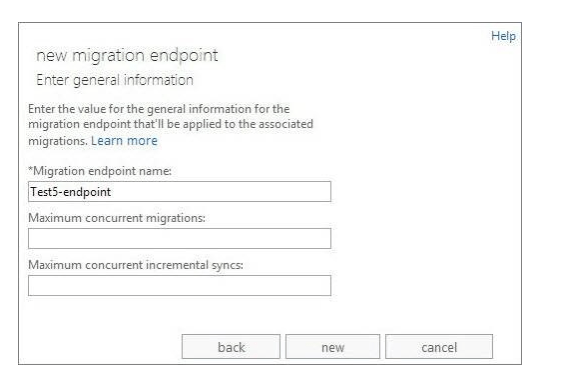
- Click New to create the migration endpoint.
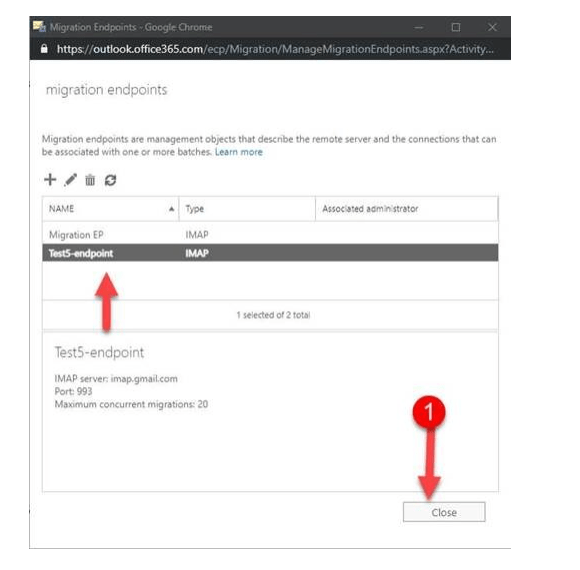
- Click Close on the Migration Endpoint page.
Step 5 - Create a migration batch in EAC and start migrating Gmail mailboxes
Use a migration batch to migrate groups of Gmail mailboxes to Office 365 at the same time. The batch consists of the Gmail mailboxes that you listed in the migration file in the previous Step 3: Connect Office 365 to Gmail.
It's a good idea to create a test migration batch with a small number of mailboxes to first test the process. Use migration files with the same number of rows, and run the batches at similar times during the day, then compare the total running time for each test batch.
This helps you determine the time needed to move all your emails. It also helps you decide on the size of each group of emails. Additionally, it helps you figure out how many connections to use at once. This will help balance speed and internet usage during the migration.
- In the Office 365 admin center, navigate to Admin center > Exchange. https://outlook.office365.com/ecp
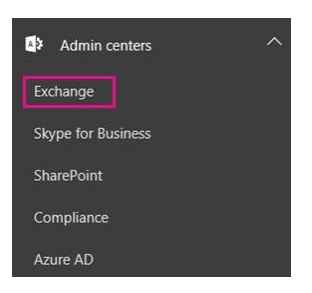
- In the Exchange admin center, go to Recipients > Migration.
- Click New > Migrate to Exchange Online.

- Choose IMAP migration > Next.

- On the Select the users page, click Choose File to specify the migration CSV file you created. After you select your migration file, Office 365 checks it to make sure:
- It isn't empty.
- It uses comma-separated formatting.
- It doesn't contain more than 50,000 rows.
- It includes the required attributes in the header row.
- It contains rows with the same number of columns as the header row.
- If any one of these checks fails, you'll get an error that describes the reason for the failure. If you get an error, you must fix the migration file and resubmit it to create a migration batch.

- After Office 365 validates the migration file, it displays the number of users listed in the file as the number of Gmail mailboxes to migrate.
- Click Next.
- On the Set the migration endpoint page, select the migration endpoint that you created for Gmail in the previous step, and click Next.

- On the IMAP migration configuration page, accept the default values, and click Next.

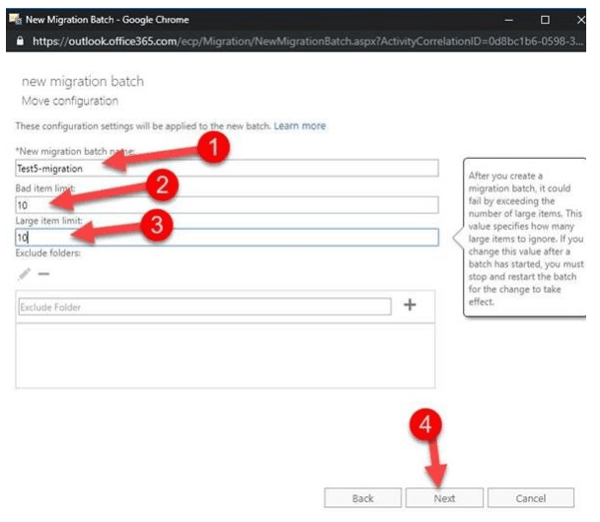
- On the Move configuration page, type the name (no spaces or special characters) of the migration batch in the box—for example, Test5-migration. The default migration batch name that's displayed is the name of the migration file that you specified.
The migration batch name is displayed in the list on the migration dashboard after you create the migration batch. You can also enter the names of the folders you want to exclude from migration.
For example, Shared, Junk Email, and Deleted. Click Add + to add them to the excluded list. You can also click Edit to change a folder name and Delete to delete the folder name. You can also define the Bad item limit and Large item limit.
- Click Next
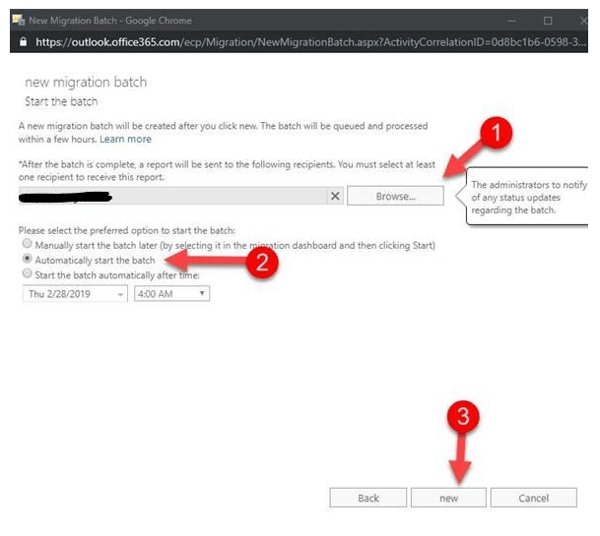
- On the Start the batch page, do the following:
- Choose Browse to send a copy of the migration reports to other users. By default, migration reports are emailed to you. You can also access the migration reports from the properties page of the migration batch.
- Choose Automatically start the batch > new. The migration starts immediately with the status Syncing.
- If you have large user mailboxes and the status shows Syncing for a long time, you may be experiencing bandwidth limits set by Google. For more information, see Bandwidth limits and Sync limits.
You can try to unlock the Gmail user or use alternative method to migrate the users. For more information, see Use network upload to import your organization PST files to Office 365 and Third-party tools for Office 365 migrations.
Step 6 - Verify that the migration worked
- In the Exchange admin center, go to Recipients > Migration. Verify that the batch is displayed in the migration dashboard. If the migration completed successfully, the status is Synced.
- If this task fails, check the associated Mailbox status reports for specific errors, and double-check that your migration file has the correct Office 365 email address in the EmailAddress column.
Step 7 - Notify your users via SMS
- Go to https://www.eztexting.com/
- Click on Log in
- Click in Contacts
- Click Add a Contact (use the phone number given to you by your users) and Save. Once done, you will see something like below.
(Note: You will have to decide if you will notify only your contact or all the users being migrated. If you need to notify every user, you will need to create a group)
- Click on the 'Blue arrow' under the 'Text' column to send a message
- In the Subject, type your company name
- Within the message section, type something like "We want to let you know that your email migration started. We will notify all of you via SMS once you can start following your Post Migration Steps"
Step 8 - DNS Access
- Validate that you can still connect to the DNS
Step 9 - Backup Client DNS settings
- Log in into client DNS and back up existing DNS
Step 10 - Add vanity domain and update DNS on new Office 365 tenant
- Log to Office 365 with Admin credentials
- Go to Admin -> Setup -> Domains
- Click on Add Domain
- Enter your domain
- You will be prompted by the Verify Domain page. Select Add a TXT record instead
- On a separate browser, open the DNS from the client and add the TXT record
- Once done, wait one minute and then click on Verify
- You will now be prompted by the Update DNS settings page. Select I'll add the DNS records myself
- Update the DNS accordingly and remove any GoDaddy email server references
- Once done, click the Refresh button until you get the message "All DNS records are correct, no error found"
Step 11 - Update Primary email addresses to new vanity domain
- On Office 365 Portal, click on Users -> Active users
- Select one user, and click Edit within the Username / Email section
- Create a new alias using the new vanity domain name and click Add
- Click Set as primary
- A big Warning yellow box will be displayed. Click Save
- Click Close
- Now ready Steps b -f for all the other users
- If you get a warning Red box saying that you need to wait up to 4 hrs, do the following steps:
- Open Windows PowerShell as Administrator and run the following commands:
- Open Windows PowerShell as Administrator and run the following commands:

Step 12 - Email Testing
- On Office 365 Portal, click on Users -> Active users
- Select one of the user and reset his password (uncheck Make this user change their password when they first sign in)
- Now, send a test email to this user
- In a separate window, open Office 365 portal, use the credential of this user, and confirm that your email was received.
- Delete the test email from their inbox as well as their deleted email folder
Consider this step completed only when both send and receive tests have been successful.
Step 13 - Password Reset
- Now, reset the passwords for all users and check make the users change their password when they first sign in
- All passwords should now have been reset
Step 14 - Set SSPR on new domain
- Within Office 365, click on Admin -> Admin centers ->Azure Active Directory
- Click on Azure Active Directory
- Click on Password Reset
- Under Self-service password reset enabled, select All
- Click Save
Step 15 - Stop Email synchronization from Gmail by Deleting the Synced migration batches
- Let the migration batch run for at least 72 hours (3 days) before you delete it. This makes the following two things more likely:
- Your Gmail mailboxes and Office 365 mailboxes have synchronized at least once in 24 hours (they synchronize once a day).
- The email systems of your customers and partners have recognized the changes to your MX records and are now properly sending email to your Office 365 mailboxes.
- One you verified that all emails are being routed to Office 365 after switching the MX records, you can Delete the Migration batch. After you delete the migration batch, the synchronization between Gmail and Office 365 will stop.
- When you delete the migration batch, the migration service cleans up any records related to the migration batch and removes it from the migration dashboard.
- To Delete a migration batch, use the below steps:
- Go to Exchange admin center > Recipients > Migration.
- On the migration dashboard, select the batch, and then click Delete.
- How do you know this worked?
- In the Exchange admin center, navigate to Recipients > Migration. Verify that the migration batch no longer is listed on the migration dashboard.
Stage 3: Post-Migration
Step 1 - Reset your password
To connect to your new email:
- Go to https://www.office.com
- Click on Log in
- Use your credentials
- Username: <your email address> (i.e.: johndoe@contoso.com)
- Temporary password: NewPassw0rd! (<-just an example)
- Follow the wizard to reset and create your own password.
- Once done, you will be able to check your email on your smartphone (iOS or Android) using the Outlook app and/or via Office 365 Outlook Web (as shown below)

Step 2 - Install Office 365 on your PC or Mac
- Go to https://portal.office.com/OLS/MySoftware.aspx
- Click on Log in
- Use your new credentials as created in “Step 1 - Reset your password.”
- Your screen should look similar to the following

- Click the Install button to download and install Office 365 on your computer
Step 3 - Update Office 365 to the latest version
- Open Microsoft Word
- Click on Files
- Click on Office Account
- Click the button Update Options -> Update Now
- Microsoft Office will install an update or you will get a message such as "You're up to date! The latest version of Office is installed on your computer"
Step 4 - Install Outlook to check your email
- If you're on a Mac then follow these instructions, where you will find information on how to:
- Add email accounts
- Welcome to your inbox
- Create and send email
- Organize your inbox
- Create an email signature
- Welcome to your calendar
- Schedule a meeting or appointment on a Mac
- If you use a PC, then follow these instructions, where you will find information on how to:
- Add an email account
- Create and send email
- Manage calendar and contacts
- Collaborate
- Set up your mobile apps
- Learn more
There you go, that's everything you need to know about migrating your email from Gmail to Office 365. If you have any questions feel free to shoot us an email, give us a call, or use the chat box in the bottom right-hand corner.
Don't want to do it yourself? Schedule a meeting and we'll do it for you.

We've got more resources for you to become a cyber-pro.

Leave us a comment!