
Difficulty Level: Intermediate | Time Investment: 1-1.5 hours
Summary: Many small businesses start in the GoDaddy world but quickly outgrow what GoDaddy is able to offer and then become stuck. This guide will take you thorough the steps necessary to migrate your existing GoDaddy configuration to Microsoft 365 and take your business to the next level.
The most common migration we do at BEMO is moving customers from GoDaddy to Office 365. We know the masses can't be migrating just because we are really good at them (we are). So, why are so many businesses moving from GoDaddy?
Often, the story goes a little like this: you searched the web and found GoDaddy domains, then signed up for one, they offered email and you thought...why not?! Now, months or years later, the confinements of their locked in contracts and worse yet, their locked down capabilities (read: restricted global admin privileges) for Office are restricting your company's growth. And GoDaddy customer support? Let's just say it's lacking.
Thankfully, there's an easy solution: migrate. Once the Project is created, you need to add items to the project. While a migration is a hearty endeavor, it's doable with some preparation and lucky for you, we've done all the prep you'll need.
Read along as we take you step-by-step through your migration from GoDaddy and into the full potential of Office 365.
REMEMBER: If at some point you get lost - or tired, we are here for you! Just open our web chat on the right side of this web page or schedule a call with our team by clicking the button below.
Table of Contents
- Video Walkthrough
- Migrate GoDaddy to Office 365 (23 main steps with several substeps)
DNS
Destination Part 1
Source Part 1
BitTitan
Source Final Part
Destination Final Part - Post-migration steps for GoDaddy (6 main steps with some substeps)
Video Walkthrough
Prefer to follow a video format? Here is a complete walkthrough of migrating from GoDaddy to Microsoft 365:

Before we start, take a look at the Migration Journey Overview:

Step by Step Guide
Prefer PDF instructions? Download our GoDaddy to Microsoft 365 Migration Step-By-Step eBook.
Step 1: DNS Access
-
-
Validate that you can still connect to the DNS on GoDaddy (or whatever DNS provider you are using).
-
Step 2: Backup Client GoDaddy DNS settings
-
Sign in to your GoDaddy Domain Portfolio. If you are not using GoDaddy DNS, follow the steps from your provider!
-
Select
 Domain Edit Options next to your domain and then select Edit DNS. You may need to scroll down to see the Edit DNS option.
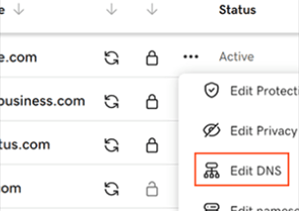
-
Select Export Zone File from the
 More menu.
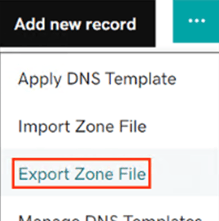
-
The file will automatically download via your browser to your device. Open the file locally to view the records. Reference: Export my domain's zone file records | Domains - GoDaddy Help US
 Have you purchased licenses for Microsoft 365 yet?
Follow the link to authorize BEMO to be your Microsoft Cloud Solution Provide (CSP) and provision your necessary licenses - Purchase Licenses from BEMO
Step 3: Destination: Turn off security defaults in the Destination Microsoft 365 Tenant
-
Log into the target Microsoft 365 admin portal https://portal.office.com, making sure you are a Global Administrator on this tenant.
-
Now we will turn off the security defaults. These will turn back on after the final migration.
-
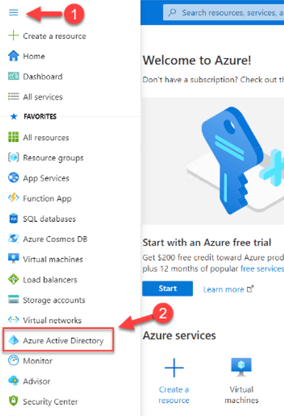
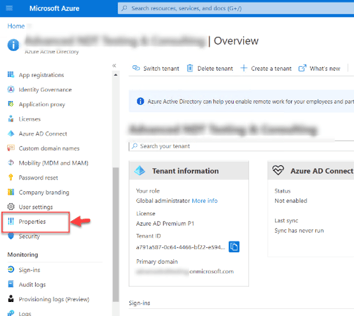
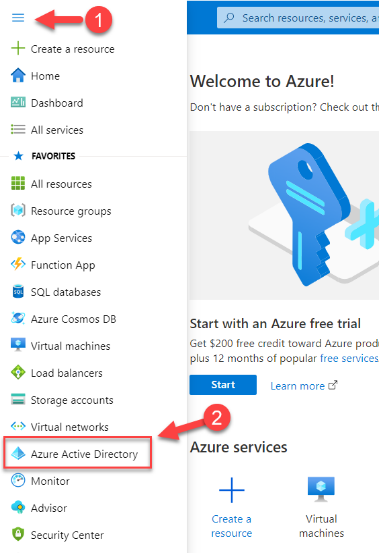
Open another tab and go to https://portal.azure.com.
-
Click on the Menu bar on the left and then Azure Active Directory.
-
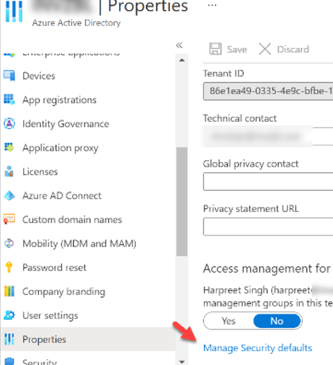
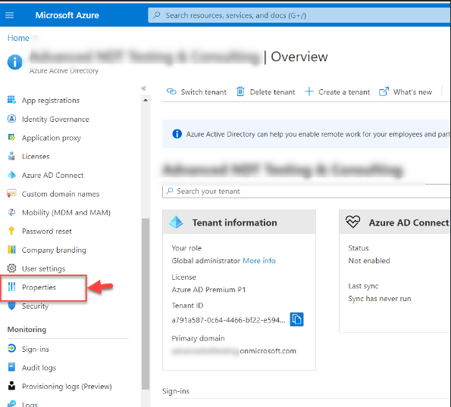
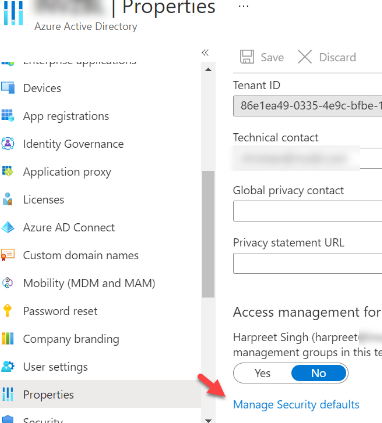
From the left menu, click on Properties blade.
-
Scroll down at the bottom and then click on Manage Security defaults.
-
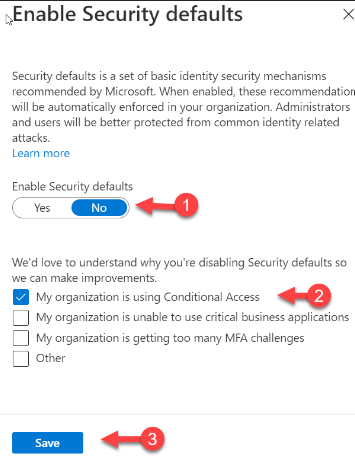
Set "Enable Security defaults" to No and select any option like "My organization is using Conditional Access" and hit Save.

Step 4: Destination: Add users and licenses in destination Microsoft 365 tenant
-
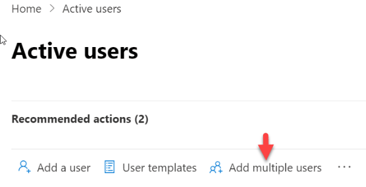
Go back to https://admin.microsoft.com > Users > Active Users.
-
Click on + Add multiple users.
-
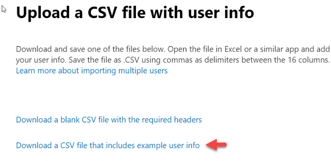
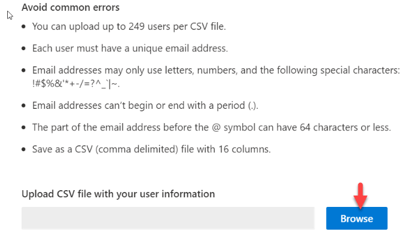
Click on Download a CSV file that includes example user info.
-
Update your CSV with User Information and fill in the following details - Username, First name, Last name, Display name, Country or region.
Make sure User Principle Name in the Username column has the UPN suffix of the matching .onmicrosoft.com domain name as in the Destination Microsoft 365 tenant.
The CSV with updated fields should look like the below screenshot. Note: Do not add Mobile Phone number for target users. Leave the field as Blank.
-
Save the updated CSV, go to the Microsoft 365 Admin center, and under Upload CSV file with your user information, click on Browse and browse to the location where you have your CSV file saved on your PC.
-
Once the CSV and user validation is complete, click on Next.
-
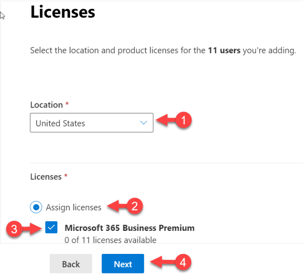
Select the Usage location, click on Assign licenses, check mark the appropriate licenses to be assigned to the users and click on Next.
-
In the Review and finish adding multiple users, click on Add users.
-
If you have shared mailboxes, they cannot be recreated in the destination tenant using the above method. You will need to go to admin.exchange.microsoft.com, Recipients, Mailboxes and Add a shared mailbox.
Step 5: Destination: Prepare the destination Global Admin account for Application Impersonation
Application Impersonation must be assigned to the source and destination Microsoft 365 Global Admin. Additionally, Organization Management may need to be assigned for the Application Impersonation assignment to work.
The Application Impersonation Management role enables applications to impersonate users in an organization to perform tasks on behalf of the user. Included in this section are:
A. Steps to assign the Organization Management Role
B. Steps to assign the Application Impersonation Role
C. PowerShell script that assigns Application Impersonation Role and enables Organization Customization
*Make sure the admin account you are using is a Global Admin in the destination Microsoft 365 tenant Global Admin account.
A. Steps to assign the organization management role
*Depending on your service offering, this step might not be necessary. If it is necessary, it must be performed prior to enabling App Impersonation.
-
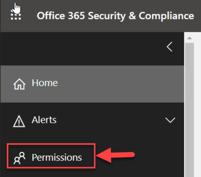
Open a new tab and go to https://compliance.microsoft.com/
-
Click on Permissions.
-
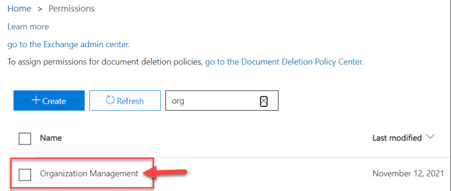
Search for Organization Management and click on it to open it.
-
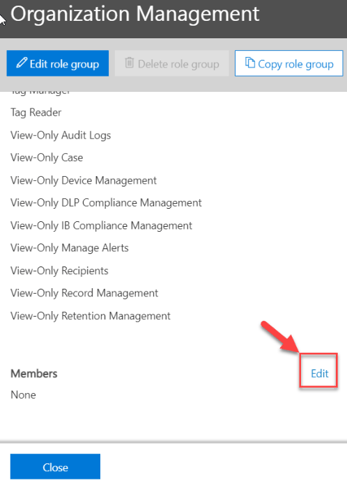
On the right side, scroll to the bottom and click on Edit next to Members.
-
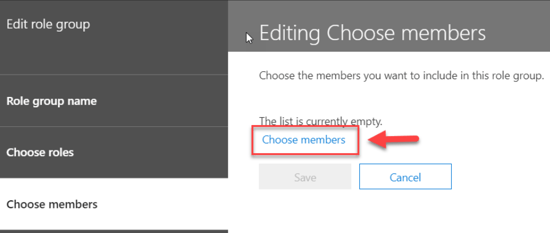
Click Choose members.
-
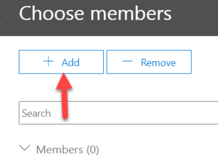
Click + Add.
-
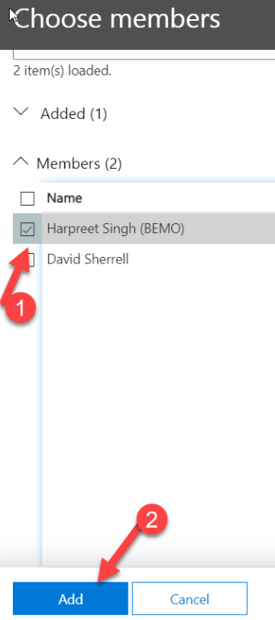
Select your Global Admin account and click Add.
-
Click Done, Save, and Close.
Note: It may take 30-45 minutes for this to take effect, so you may need to wait to move on to the assigning the Application Impersonation Role.
B. Steps to assign the application impersonation role
-
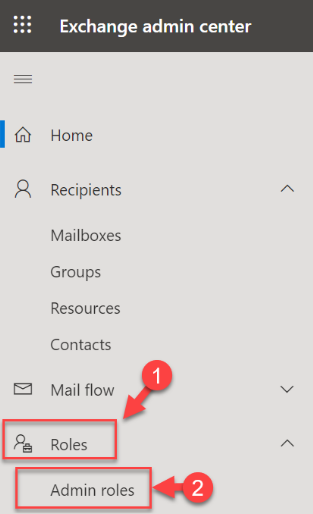
Open a new browser and go to https://admin.exchange.microsoft.com,click on Roles > Admin Roles.
-
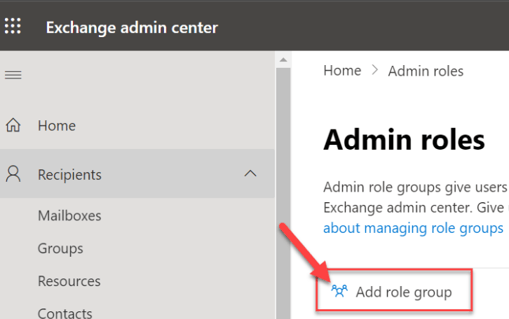
Click on Add role group.
-
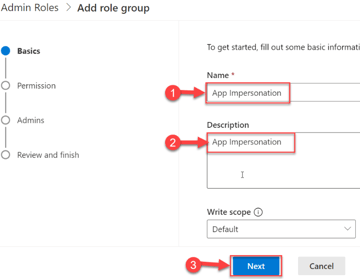
Give a Name - App Impersonation, Description, Write Scope - Default and click Next.
-
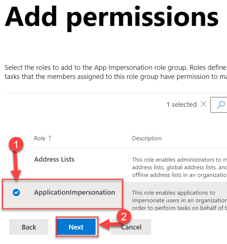
In the Add permissions page, Select Application Impersonation and click on Next.
-
In the Assign admins page, add the Global Admin account of the destination M365 tenant and click on Next.
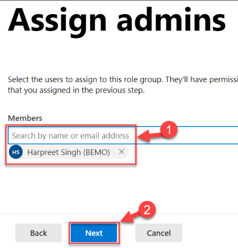
-
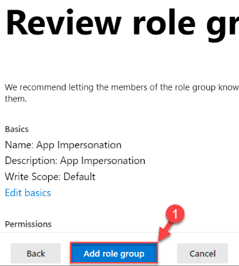
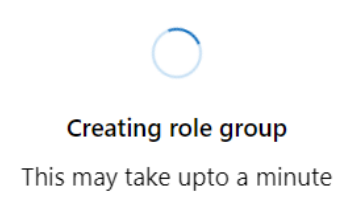
In the Review role group and finish page, click on Add role group. This may take a few minutes, so wait while the process completes.
-
Click on Done.
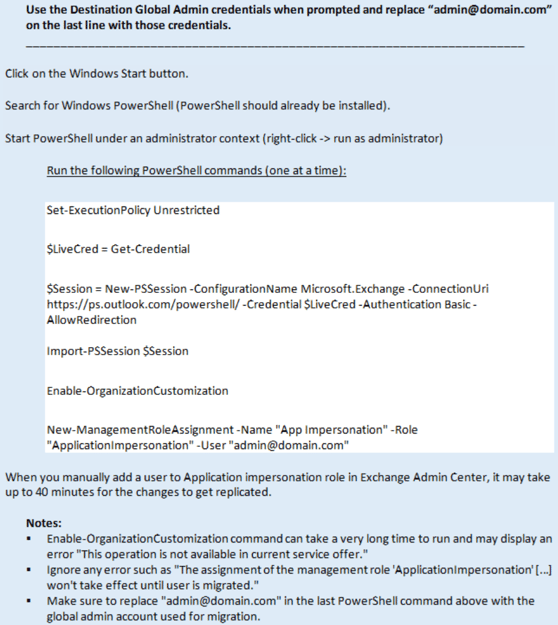
C. PowerShell script to assign app impersonation role and enable organization customization
Step 6: Destination: Change the default message size restrictions in Destination Exchange Admin Center
-
Change the default message size restrictions in Destination Exchange Admin Center.
-
You can take this step before running the Initial sync or final delta Sync for all the email migrations from GoDaddy Microsoft 365 or simply Microsoft 365 to Microsoft 365 (tenant to tenant) email migration.
-
Login to Microsoft 365 Exchange Admin. Center https://admin.exchange.microsoft.com in the destination Microsoft 365 tenant.
-
Click on Mailboxes under Recipients.
-
Click on Mailflow setting and then Message size restriction.
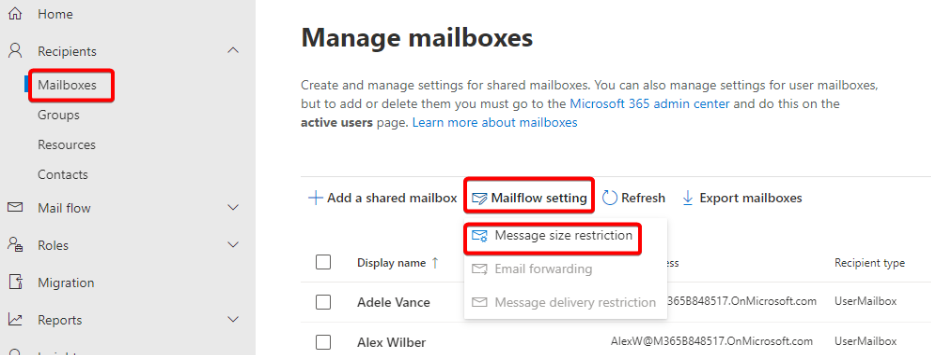
-
Change the Sent messages maximum size(KB) & Received messages maximum size(KB) to 153600 and click on Save.
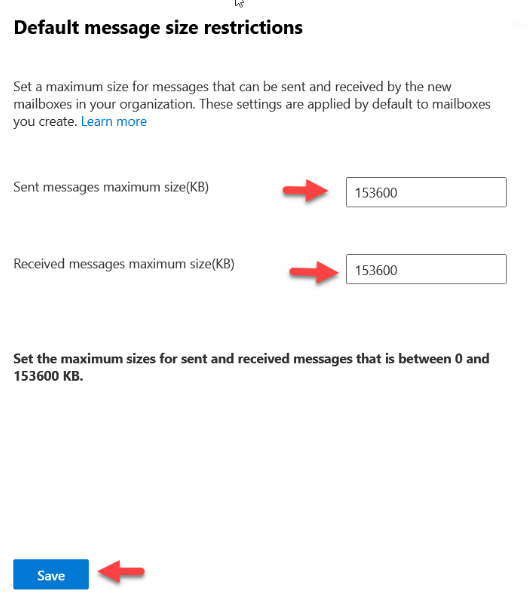
- You will get the prompt - Settings updated. It may take up to 5 minutes for these changes to appear. Click on X to close the prompt.

Step 7: Source: Become Tenant Admin on GoDaddy
-
Go to Azure AD Portal https://portal.azure.com (in private mode).
-
Use the GoDaddy credential from one of the users with Admin privileges.
-
Once on the Azure portal, select Azure Active Directory.
-
Go to Users.
-
Look for an Admin account that looks like admin@NETxxxx.onmicrosoft.com.
-
Select this user account and click on Reset Password at the Top Navigation pane > Reset Password.
-
You will get a temporary Password, Copy the temp password as well as the admin@xxxx.onmicrosoft.com username into Notepad.
-
Sign-Out of the Azure Portal and open a new browser session and login to https://portal.azure.com with the New Global Admin Account. admin@xxxx.onmicrosoft.com. During the first sign-in, reset the password and set a new password.
-
Make sure to save it locally on Notepad.
-
Important: make sure that the Global Account is licensed, too!
Step 8: Source: Turn off security defaults in the source tenant
-
Log into the source GoDaddy admin portal https://portal.microsoft.com. *Make sure you are a Global Administrator on the GoDaddy tenant.
-
Go to https://portal.azure.com.
-
Click on the Menu bar on the left and then Azure Active Directory.
-
From the left menu, click on Properties blade.
-
Scroll down at the bottom and then click on Manage Security defaults.
-
Set "Enable Security defaults" to No and select any option like "My organization is using Conditional Access" and hit Save.
Step 9: Source: Prepare GoDaddy Global Admin account for Application Impersonation
- Repeat steps in Step 5, making sure the admin account you are using is a Global Admin in the GoDaddy tenant.
- If you choose to use Powershell, use the Source GoDaddy Global Admin credentials when prompted and replace “admin@domain.com” on the last line with those credentials.
Step 10: BitTitan: Create a Migration Project on BitTitan and Perform a first Pre-Stage Migration
-
Sign in to the MigrationWiz account.
-
Click the Go to My Projects button.

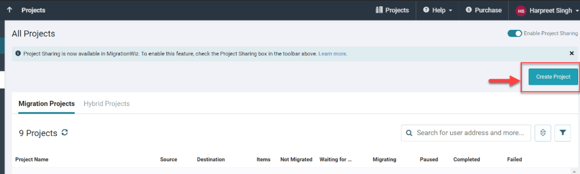
-
Click the Create Project button.
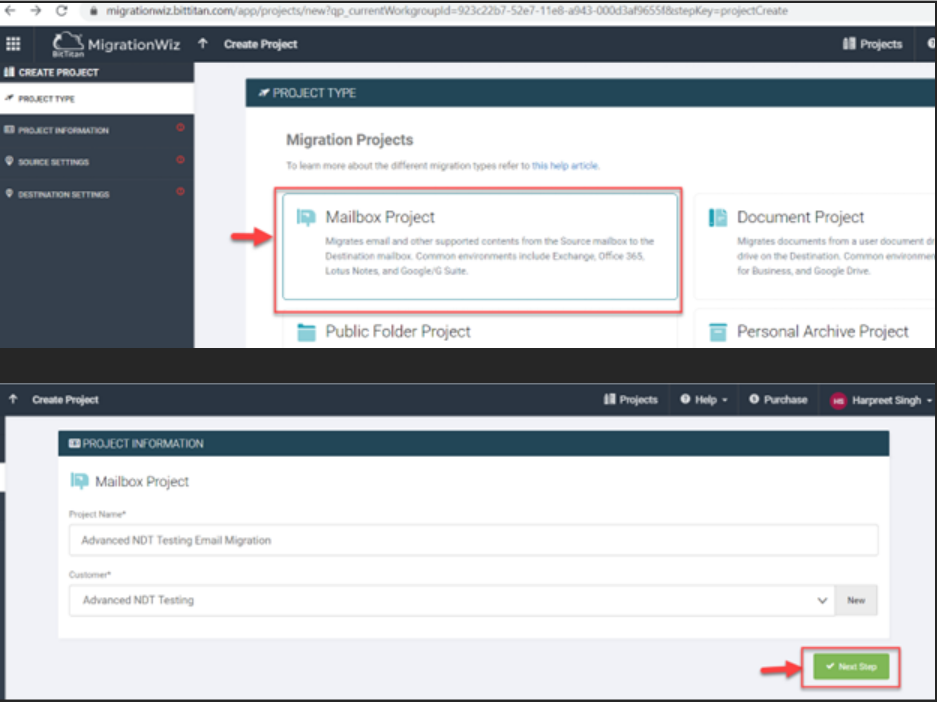
-
Click on the type of project that you wish to create. For this migration click on Mailbox Project.
-
Mailbox: Mailbox projects are used to migrate the contents of the primary user mailbox from the previous environment to the new environment. Most mailbox migrations can migrate email, calendars, and contacts.
For mailbox migrations, use administrative credentials to access mailboxes. In most migration scenarios, the admin account needs to have full access rights to the Source mailboxes.
-
-
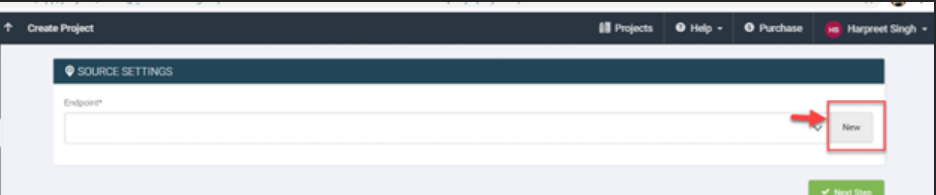
Select a Source Endpoint from the Endpoint dropdown menu or create a new one following the steps below. Click New.
-
Name endpoint. Give a logical name in the Endpoint Name field that represents the Source Tenant (for example - S3 Technologies Email Source).
From the Endpoint type drop down, Select Office 365. Enter the Global administrator username and password for the "GoDaddy source Admin". Click Add.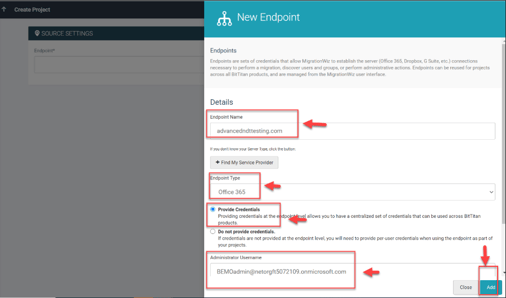
-
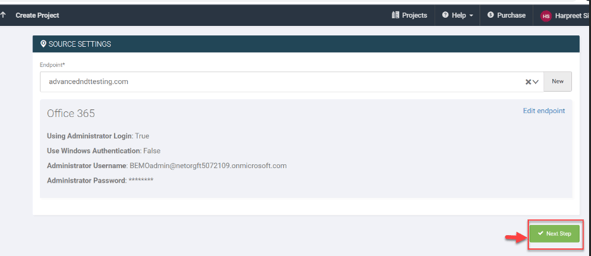
Click Next Step.
-
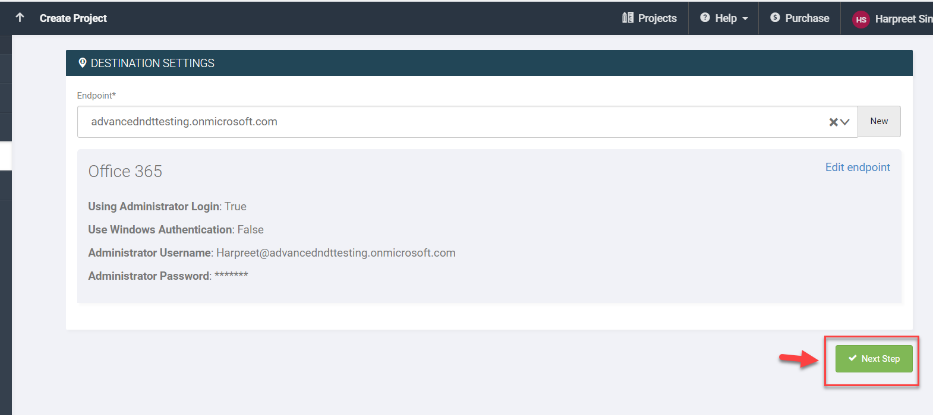
In the Destination Settings Endpoint page, click on New. Name endpoint. Give a logical name in the Endpoint Name field that represent that it is the Destination/target Microsoft 365 Tenant (for example - MyCompany Email Destination).
From the Endpoint type drop down., Select Office 365. Enter the Global administrator username and password for the "Target office 365 Global Admin". Click Add. -
Click Next Step.
-
In the Tenant to Tenant Coexistence page, keep the option unchecked and click Save and go to Summary.
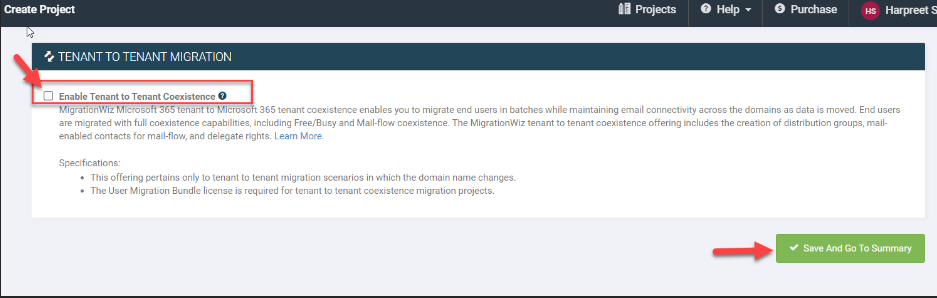
-
After that click on save project.
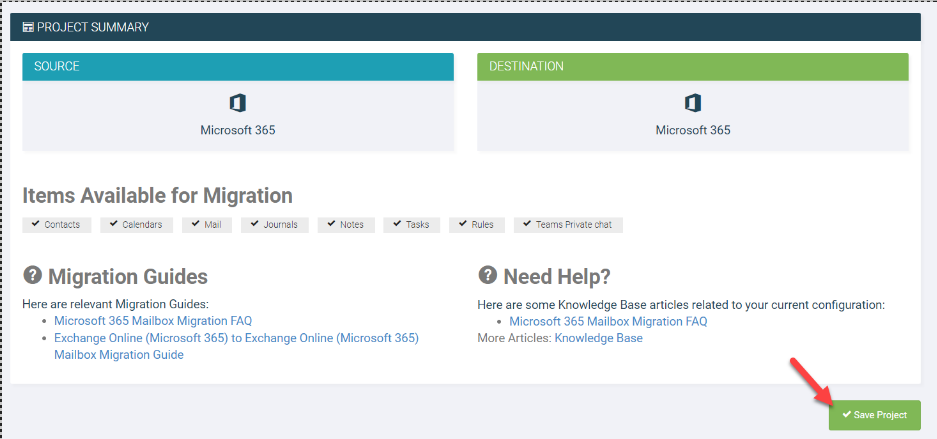
-
Once the Project is created, you need to add items to the project. Adding items means adding Users to the project that needs to be migrated.
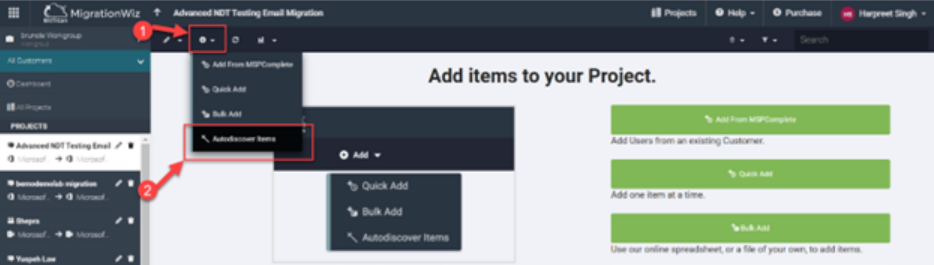
In the Add items to your Project page, click on Autodiscover items. For the tool to Autodiscover items, both the Admin accounts in the Source and the target tenant must have an Exchange Online license and a valid mailbox. Click Autodiscover items.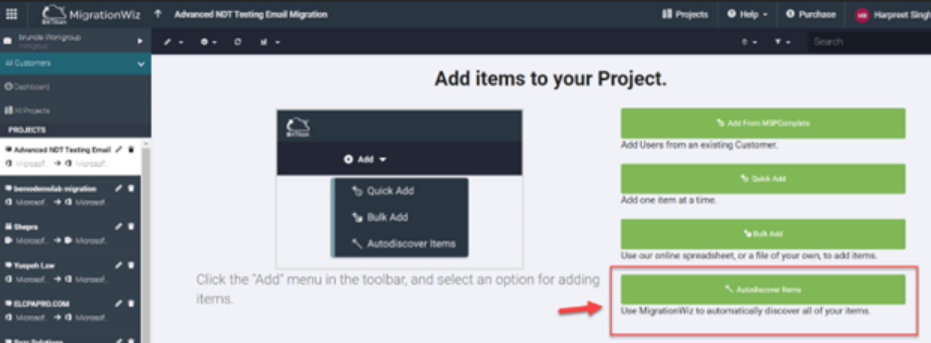
-
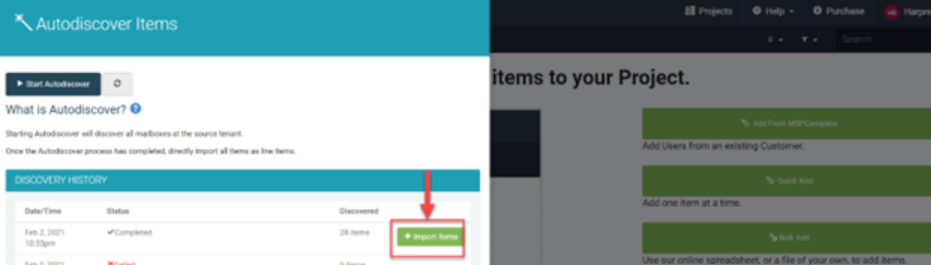
Click on Start Autodiscover.
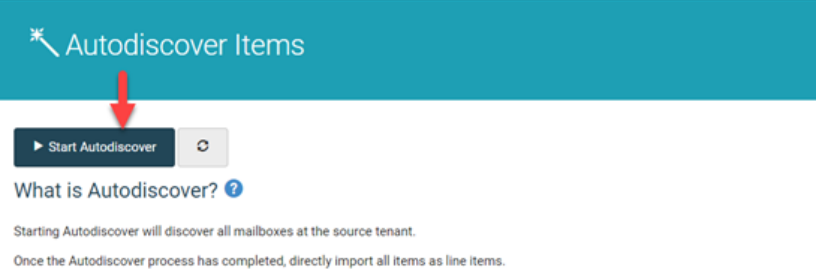
-
You can also choose to Autodiscover the items from the top of the page. Click on the + sign and then Autodiscover items.
-
Click Start Autodiscover.

-
Once all the items are Discovered, click on + Import Items.
-
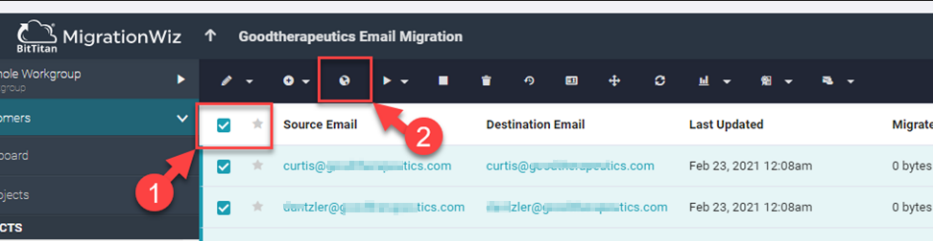
Once all the items are imported, please check the source and destination domain name in the email address against the usernames. If the domain name is showing the same in the source as well as destination, you will need to update the destination domain name for all the users. Select all the users from the top left. Click on the globe icon at the top.
-
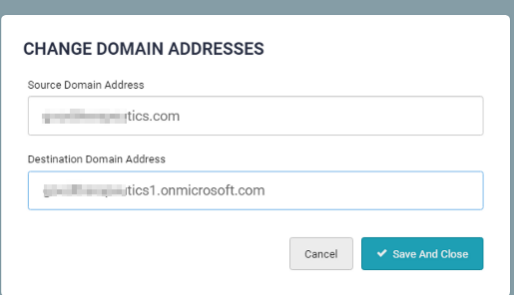
Enter the correct Domain address in the Destination Domain Address box and click on Save and Close.
-
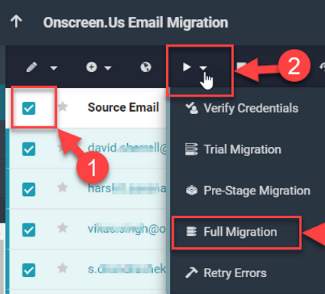
Once the source and destination domain address are verified, select ONLY the mailboxes that you want to migrate. Make sure to uncheck the Global Admin or the admin account that you do not want to migrate. Click on Start and then Verify Credentials.
-
Click on Ok on the prompt.
-
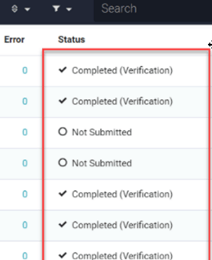
You will see that Status changed to Submitted. Wait until all jobs are completed (it can take a few minutes).
-
Click on Refresh Button. Check if the Verification passed or Failed. Once the verification is completed for all the mailboxes, proceed with Pre-Stage Migration and BitTitan license purchases.
-
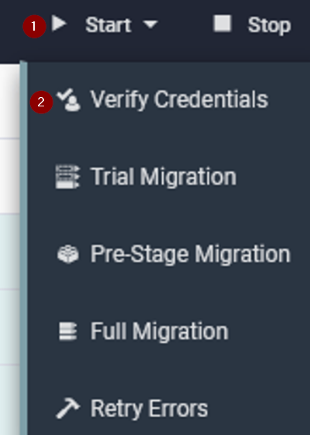
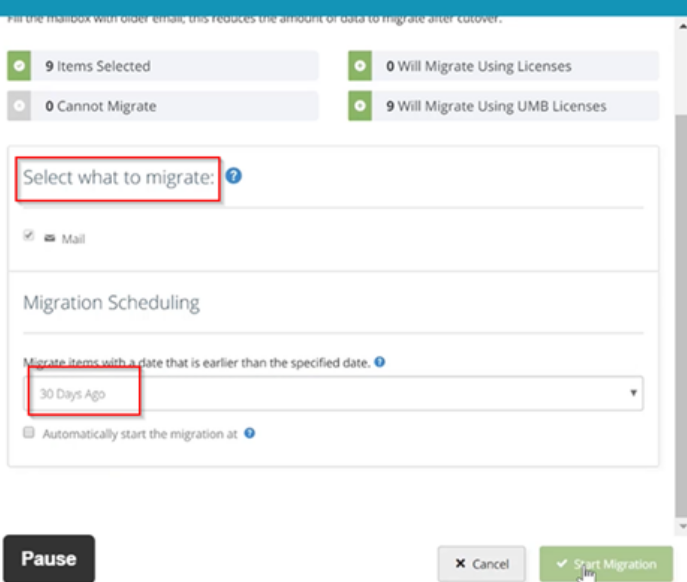
Before we purchase the licenses, select the mailboxes that you need to migrate and Click on Start and Select Pre-Stage Migration.
-
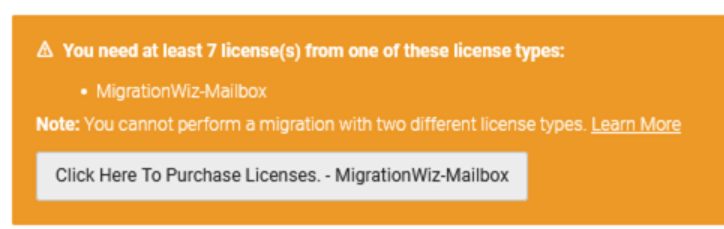
On the Start Migration Page, if you do not have licenses, you need to purchase the licenses using a credit card and address. Click on Click Here to Purchase Licenses - MigrationWiz-Mailbox.
- Once the licenses have been purchased, Select the mailboxes that you need to migrate and Click on Start and Select Pre-Stage Migration. Select applicable items in What to migrate.
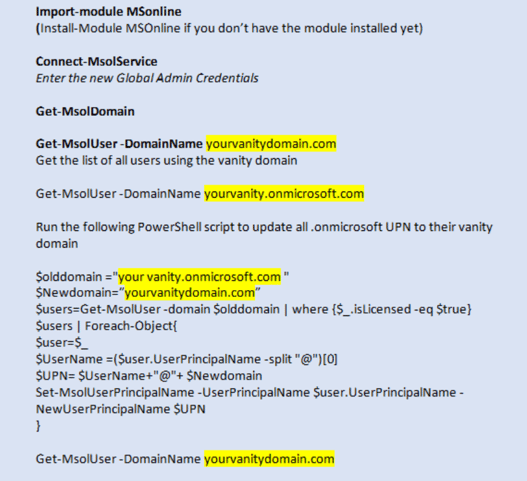
Step 11: Source: Update all vanity domain UPNs to onmicrosoft.com
Perform this step before porting your vanity domain to the new tenant as part of the final migration. he xxx@netorgxxx.microsoft.com aliases. 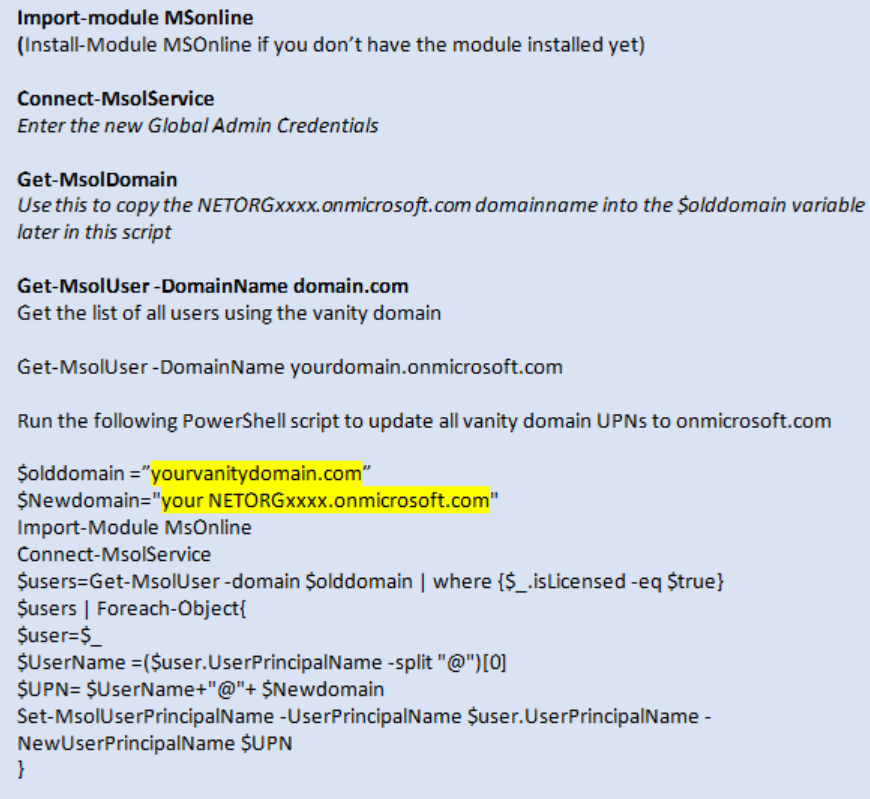
Step 12: Source: Check if Directory Sync is enabled on the source tenant

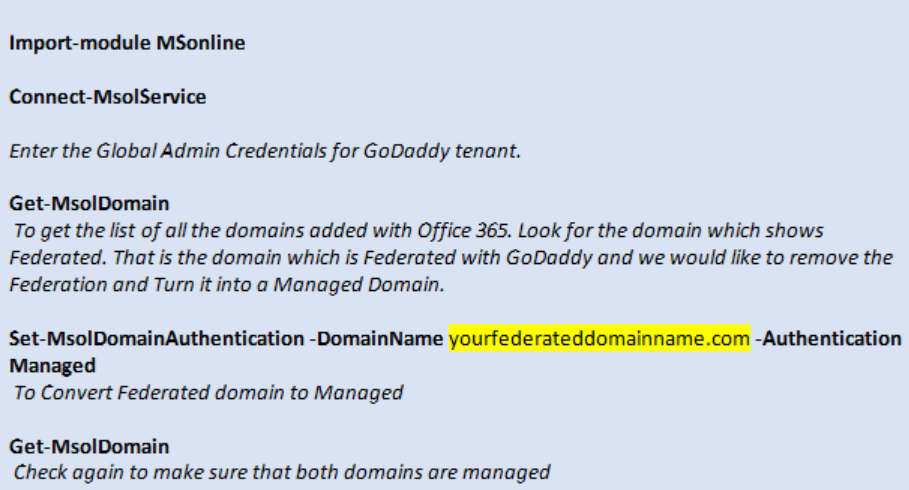
Step 13: Source: Remove Federation with GoDaddy
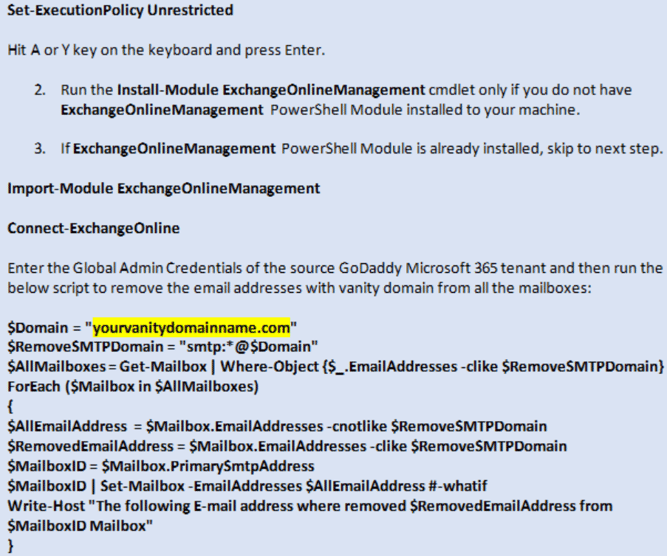
Step 14: Source: Delete any vanity domain reference within Exchange Online
Step 15: Source: Remove Vanity Domain from GoDaddy

Step 16: Destination: Add vanity domain and update DNS on destination tenant
-
Log to destination https://admin.microsoft.com with Admin credentials
-
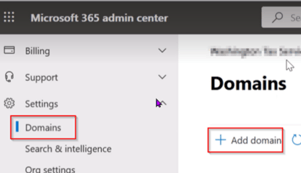
Go to Settings-> Domains
-
Click on Add Domain
-
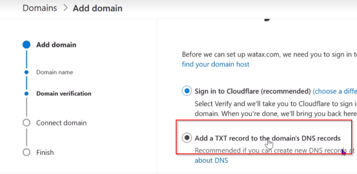
Enter your vanity domain and click Use this domain.
-
You will be prompted by the Verify Domain page. Select Add a TXT record and click Continue.
-
Suggested text records will be provided. You will copy these records and update your DNS.
-
On a separate browser, login to your DNS provider from the client. BACKUP YOUR DNS if you haven’t already completed this: Step 2.
-
Add the TXT record.
-
Once done, wait one minute, go back to the M365 Verify Domains and then click on Verify.
-
You will now be prompted by the Update DNS settings page. Select I'll add the DNS records myself.
-
Update the DNS accordingly and remove any GoDaddy email server references .
-
Once done, click the Refresh button until you get the message "All DNS records are correct, no error found."
Step 17: Destination: Update UPNs to the new Vanity Domain
This will update individual, shared mailboxes, and resource accounts.
Step 18: Destination: Test email delivery
-
On Microsoft 365 Portal, click on Users -> Active users.
-
Select one of the user and reset his password (uncheck “Make this user change their password when they first sign in”).
-
Now, send a test email to this user.
-
In a separate window, open Office 365 portal, use the credential of this user, and confirm that your email was received.
-
Delete the test email from their inbox as well as their deleted email folder.
Step 19: BitTitan: Re-run Full Migration Pass
-
This step is important: a final synchronization needs to be performed to make sure that all emails have been captured.
-
Sign into your BitTitan account once the domain has been correctly added on Microsoft 365. Modify the project setting and change the source to be the admin account on the netorgXXX.onmicrosoft.com account instead of the vanity domain.
-
Select all the users and run a Full Migration Sync.
Step 20: Destination: User Password Reset
-
Now, reset the password for all users (using this password as part of his Post Migration Steps).
-
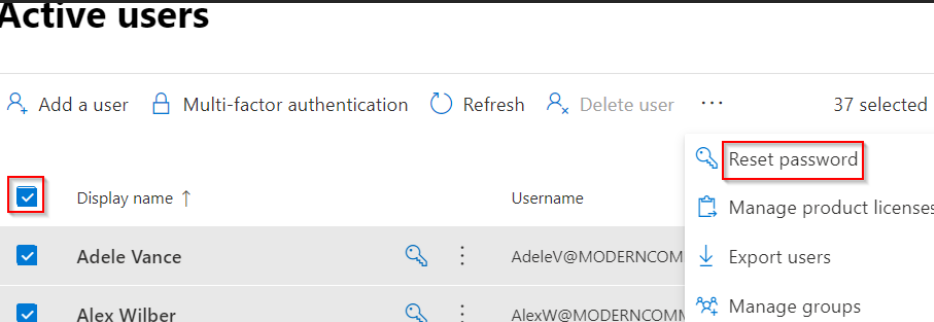
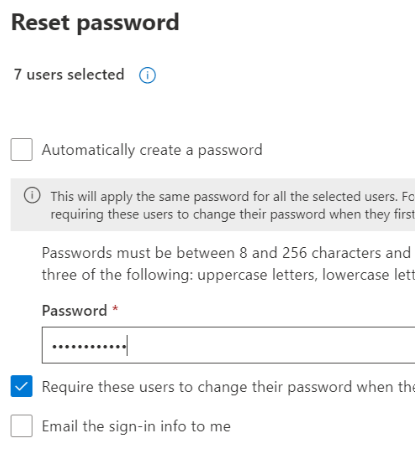
Go to the Microsoft Admin Portal and click on Active Users, select all users and click on the 3 dots to select reset password.
-
Deselect “Automatically create a password”. Set a strong password that you will communicate to all users in the Post Migration. Select “Require these users to change their password when they first sign in.”
-
Or, run the following PowerShell script.
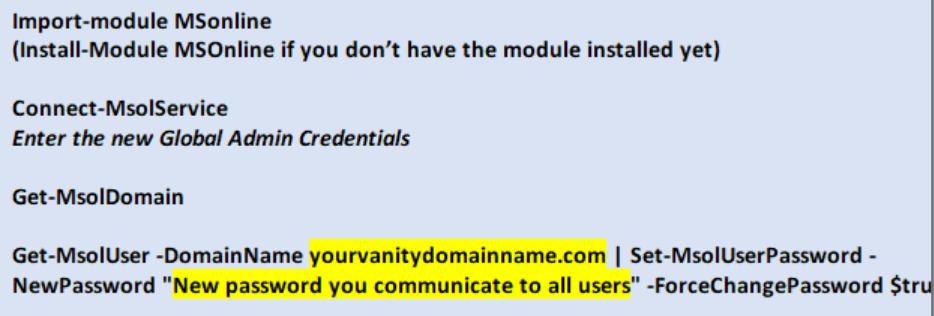
-
All passwords should now be reset.
Step 21: Destination: Enable Self-service password reset (SSPR)
-
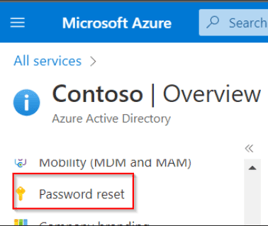
Within Microsoft 365, click on Admin -> Admin centers ->Azure Active Directory.
-
Click on Azure Active Directory.
-
Click on Password Reset.
- Under Self-service password reset (SSPR) enabled, select All.
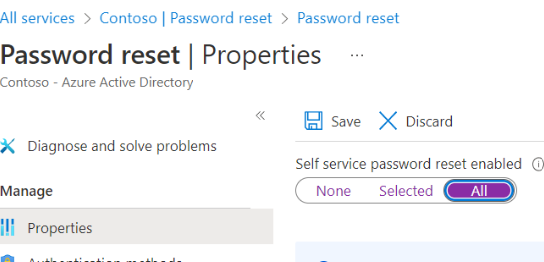
- Click Save.
Step 22: Destination: Enable Security Defaults on the Destination Tenant
-
You will be reversing what you did in Step 3.
-
Log in to the Destination Microsoft 365 admin portal https://portal.microsoft.com (you must be a Global Administrator).
-
Open a new tab and go to the Azure portal https://portal.azure.com.
-
Click on the Menu bar on the left and then Azure Active Directory ->Properties->Manage Security Defaults.
-
Set Enable Security defaults to YES and Save.
Step 23: Destination: Enable Security Defaults on the Destination Tenant
BEMO recommends this step to further protect your mail. Read our blog on how to set this up: Your Complete Guide to Microsoft Email Security (bemopro.com)
Post Migration Steps from GoDaddy to Office 365
Step 1: Recreate any distribution lists, recurring calendar appointments, categories and mail forwarding rules that you had in GoDaddy
You can still log into the GoDaddy tenant using the .onmicrosoft.com global admin credentials until you turn off the tenant. If you didn’t take note of these items prior to doing the migration, take another look and recreate them in the new tenant.
Step 2: Users sign into New Tenant and Change Password
To connect to your new email:
-
Go to https://www.microsoft365.com/. Click on Sign In.
-
Use your credentials
-
Username: <your email address> (i.e.: johndoe@contosos.com)
-
Temporary password: NewPassw0rd! (<-just an example)
-
Follow the wizard to reset and create your own password and setup Multi-Factor Authentication
-
Once done, you will be able to check your email on your smartphone (iOS or Android) using the Outlook app and/or via Microsoft 365 Outlook Web (as shown below)
-
Step 3: Disconnect Applications from GoDaddy
If users have Microsoft 365 apps installed like Word, Outlook, OneDrive, and Teams, you will need to disconnect the GoDaddy account.
-
Open Microsoft Word
-
Click on Files
-
Click on Account
-
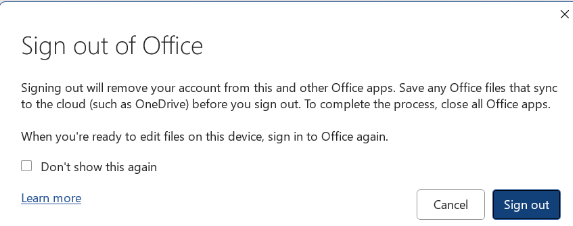
Click on Sign out. You will now get a message similar to the one below:
-
Click Sign out
-
Close all the Office Apps running on your machine.
-
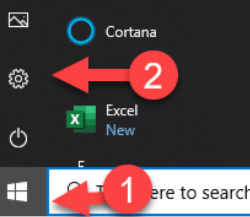
Select the Start button and then click on Settings
-
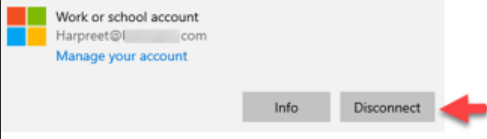
Click on Accounts->Access Work or School Account.
-
If you see a Work or School account already added there, click on it and click on Disconnect.
-
If you have OneDrive synced to your machine with your GoDaddy email account, then you need to unlink that from your PC. Right click on the OneDrive icon at the bottom right of the taskbar, click Settings->account tab->unlink this PC.

-
If you use Teams with your email account, then you must sign out of Teams also. Open Teams, click on your profile picture or initials, then click on Sign-out.
Step 4: Sign into your new Microsoft 365 Account
-
Your office applications are now entirely disconnected from your current GoDaddy tenant.
-
Open Microsoft Word
-
Click on File->Account
-
Under User Information on the top left corner, click on Sign in
-
Enter your new credentials (select work or school account if asked).
Step 5: Update Microsoft 365 Apps to the Latest Version
-
Open Microsoft Word
-
Click on Files
-
Click on Office Account
-
Click the button Update Options -> Update now
-
Office will either install an update or you will get a message such as “You’re up to date! The latest version of Office is installed on your computer”
Step 6: Activate Office
-
Click on Start button and search for Office App (soon to be renamed Microsoft365 App with a different icon)

-
When the app opens, accept the license agreement to activate Office
-
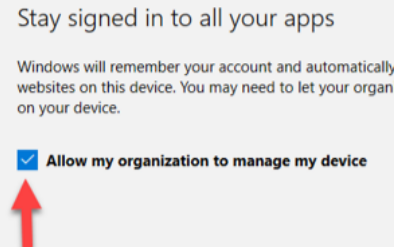
When prompted to stay signed into all your apps, check :Allow my organization to manage my device”.
GoDaddy to Microsoft 365 Migration: DIY or...?
What if you don’t know how to do this, don’t want to try and mess it up yourself, or don’t have the time?
We can do it for you😊Just open our web chat on the right side of this web page or schedule a call with our team by clicking the button below.
Check out some success stories from our clients below. You could be next!


We've got more resources for you to become a cyber-pro.

Leave us a comment!