Sensitivity labels will be the first component of Microsoft Purview that we will talk in depth about following up our Microsoft Purview Information Protection intro blog.
Sensitivity labels & policies are great for companies to encrypt their files and emails, manually or automatically, control access, and track sensitive information inside and outside of the organization.
In this article we will go through a presentation of the features that will help us answer two simple and useful use-case scenarios that will give a good understanding of how Information Protection in Purview interacts with end users and their data access. The first scenario: Protect restricted data while sharing internally only. The second scenario: Protect restricted data while sharing Externally.
In the first part we will prepare our demo tenant using PowerShell, so we can use the full functionality of Sensitivity labels. Then we will push the AIP UL (Azure Information Protection Unified) Client using Intune.
In the second part, we will walk through the menus that we will be using in the compliance portal to achieve the requirements of the two scenarios. To finish this tour, we will create a custom SIT that we will use in our scenarios.
In the final part, we will jump into our practical scenarios’ implementation steps.
Part 1: General Implementation Steps for Microsoft 365 Sensitivity Labels
We will be working from the Microsoft Purview Information Protection center (compliance.microsoft.com), specifically under the Information Protection menu.
Before that, we need to prepare our environment.
Enable AIP Features Via PowerShell
Let us first open a PowerShell in an elevated (Search for PowerShell ISE > right click the icon > run as an admin) session to run a few commands that will ensure our tenant’s capabilities are exactly as we need them to be to accommodate the coming setup.
These steps need to be done to allow AIP to work with data stored in Office 365 groups and SharePoint Online sites.
1. Make sure that the right modules are installed, by running the following PowerShell commands:
-
Uninstall-Module AzureADPreview
-
Uninstall-Module AzureAd
-
Install-Module AzureADPreview
-
Import-Module AzureADPreview
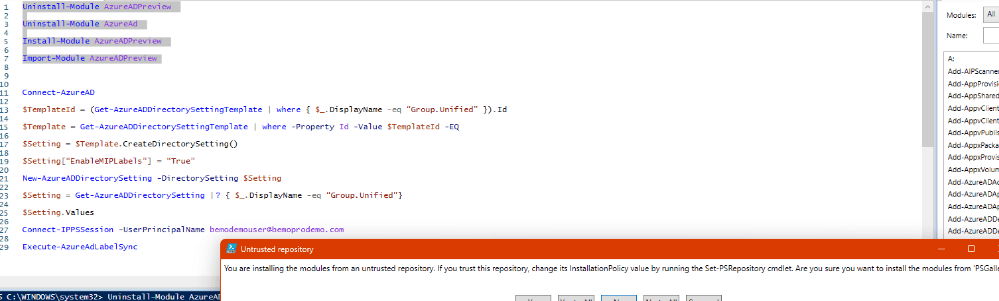
2. Sign in with a Global Administrator account:
-
Connect-AzureAD
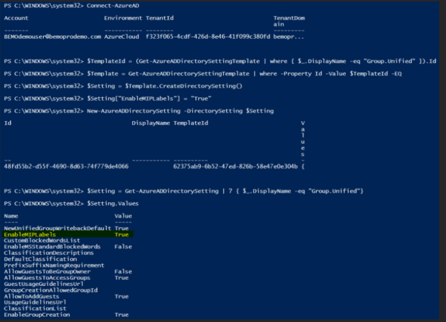
3. Enabling the MIPLabels settings at the directory level:
-
$Template = Get-AzureADDirectorySettingTemplate | where -Property Id -Value $TemplateId -EQ
-
$Setting = $Template.CreateDirectorySetting()
-
$Setting[“EnableMIPLabels”] = “True”
-
New-AzureADDirectorySetting -DirectorySetting $Setting
4. Enable the MIP Labels settings at the directory level:
-
$TemplateId = (Get-AzureADDirectorySettingTemplate | where { $_.DisplayName -eq “Group.Unified” }).Id
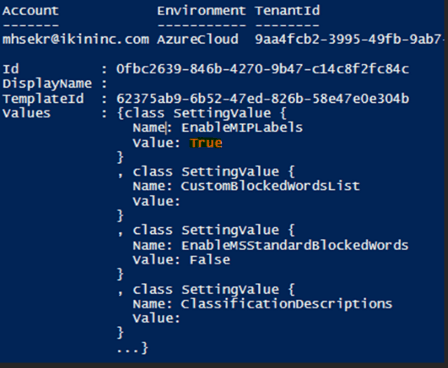
5. Check that the setting has been correctly applied:
-
$Setting = Get-AzureADDirectorySetting | ? { $_.DisplayName -eq “Group.Unified”}
-
$Setting.Values
The output of the last command should be something like this. Make sure that EnableMIPLabels is set to True.
5. Turn on the Labels Sync using the following command, connect to the Security & Compliance module.
-
Install-Module ExchangeOnlineManagement
Import-Module ExchangeOnlineManagement
Connect-IPPSSession -UserPrincipalName <GA address>
Execute-AzureAdLabelSync

Push AIP Unified Labeling (UL) Client Via Intune
The following steps require you to have Microsoft Intune deployed with your end-user devices joined to your Azure AD before being able to centrally deploy any app.
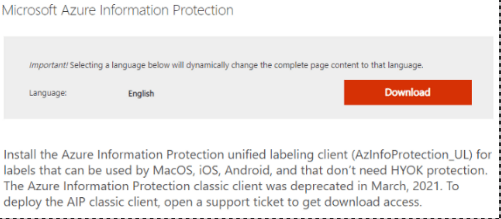
If that is not the case in your test tenant or in the client’s, then you should install it manually on the target devices. To do so: Download Microsoft Azure Information Protection Client from here and chose the exe version. https://www.microsoft.com/en-us/download/details.aspx?id=53018
In the other case, if you already have Intune deployed and devices joined, continue with the following:
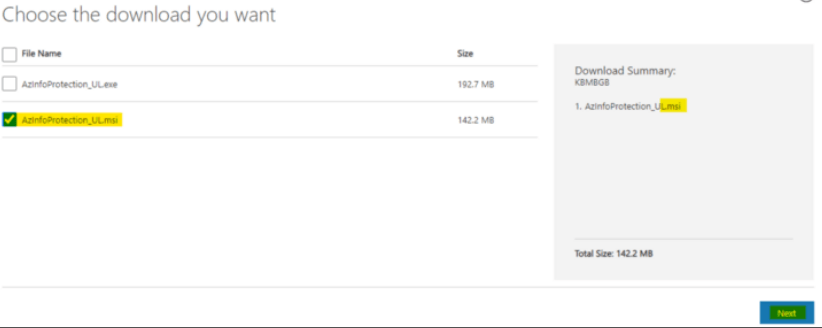
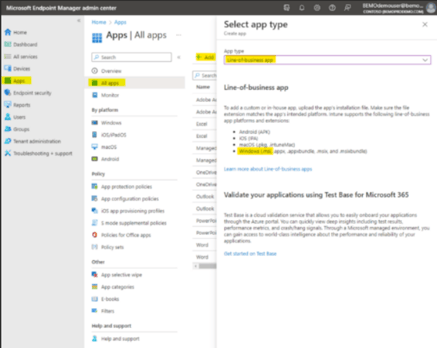
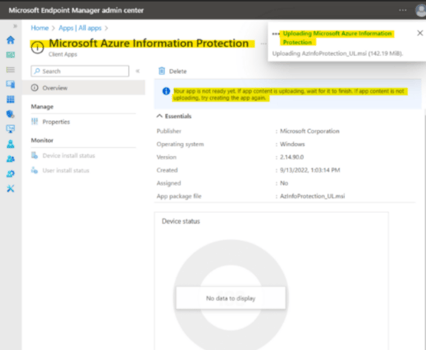
1. Download the AIP UL Client msi version. 
2. In Endpoint Manager: endpoint.microsoft.com go to the Apps menu and Add a new App. Under App Type chose Line of Business as shown below and click Select:
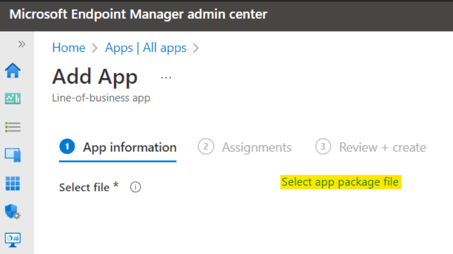
3. In the next step, you can upload the MSI downloaded in step one and click Next.
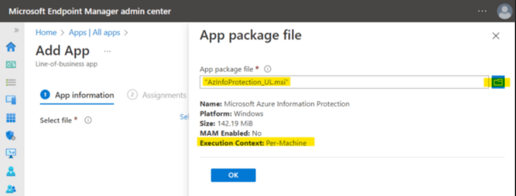
4. Click the blue button to open the File Explorer and select the AIP UL Client installation file, once the upload is done, the executable information will be displayed as shown below, click Ok:
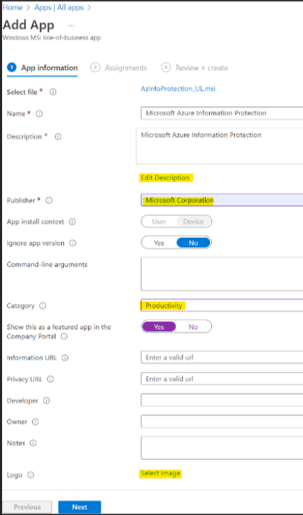
5. Name it “Microsoft Azure Information Protection” and enter Microsoft Corporation as Publisher.
6. If needed, you can also:
-
add a description for the end users,
-
make the app available in the Company Portal,
-
add a Category
-
a Privacy and Information URL.
7. Once you have filled out the additional information as needed, click Next:
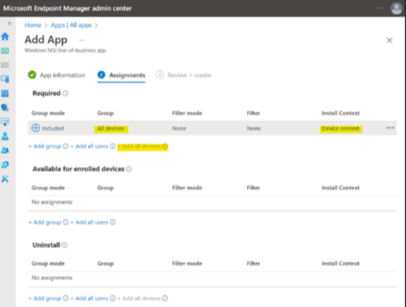
8. Assign to “All Devices” in Device Context by clicking on +Add all devices.
9. Click Next and then Create:
Part Two: Purview Information Protection Compliance Portal Walkthrough
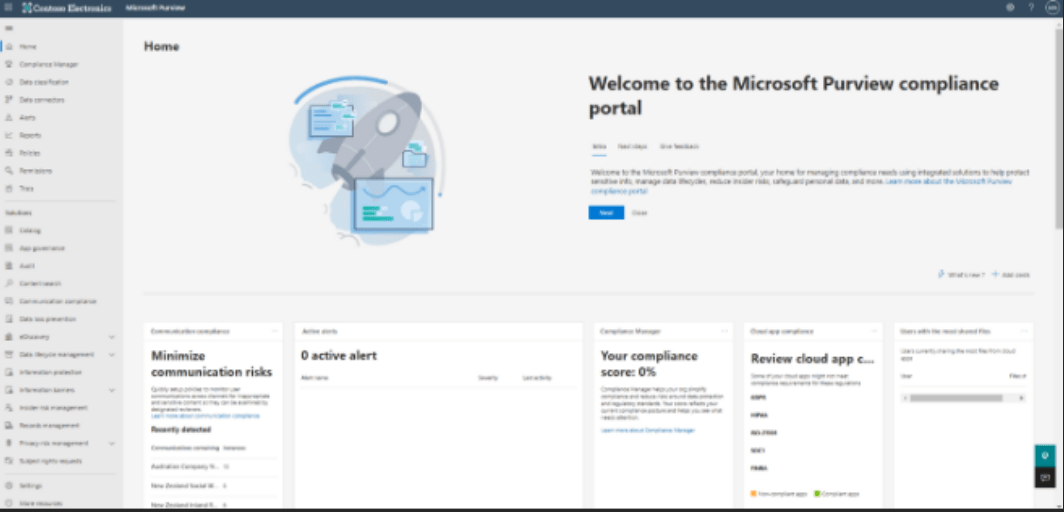
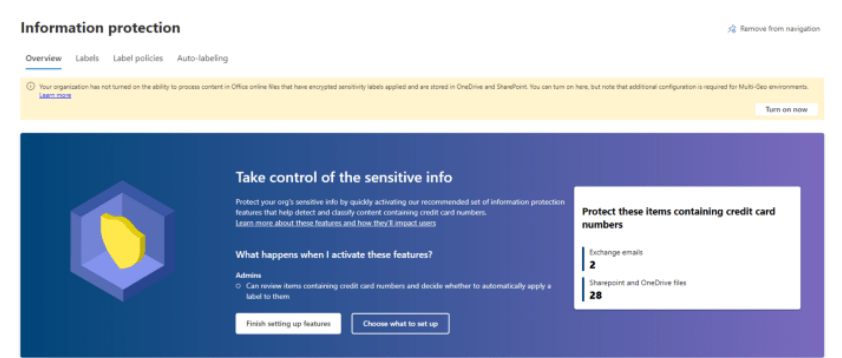
Click on Information Protection on the left pane to open the solution we will be working with along this blog.
Click Turn on now :o enable Office Files Encryption features
Sensitivity Labels Tab
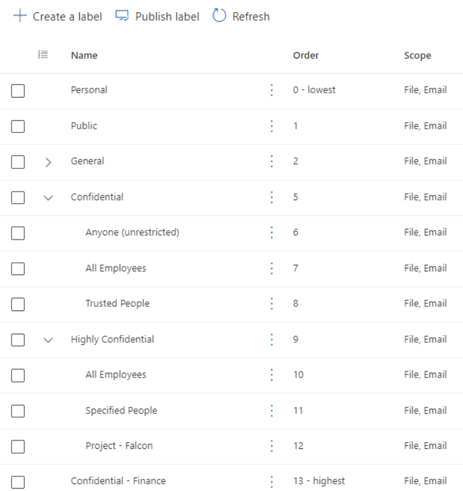
Under this tab, you will find the labels you’ve created, if any.
The highlighted text refers to the steps we have done earlier using PowerShell, so these are already completed if you ran them, too.
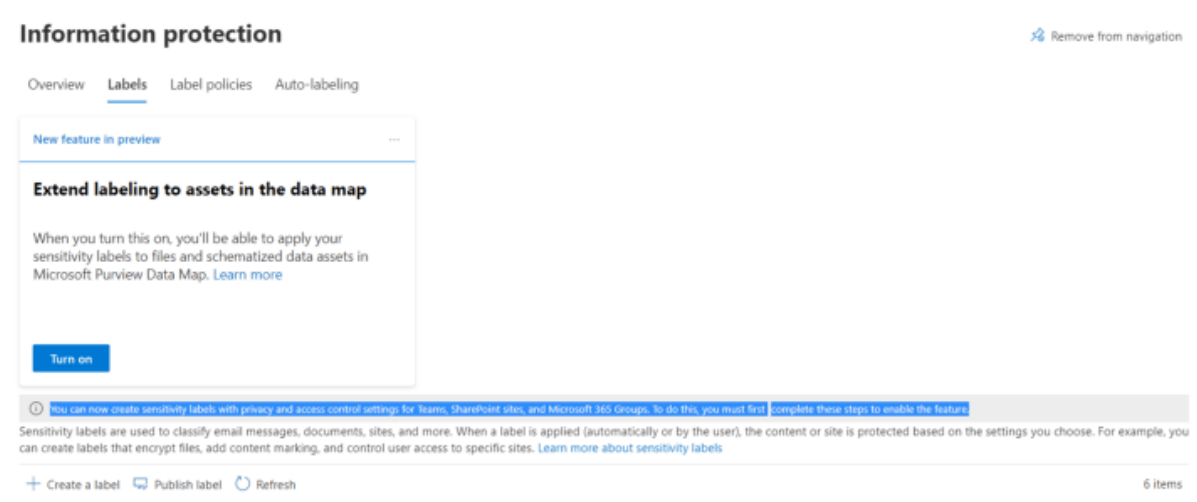
It is also possible to create Sub-labels after the parent has been set up. For example:
The applicable scenarios can be diverse, and later, in this blog, we will detail 3 of them to give you enough ideas and set up your own environment as needed.
Sensitivity Labels Policies Tab
The next tab will show the different policies created and assigned to your users.
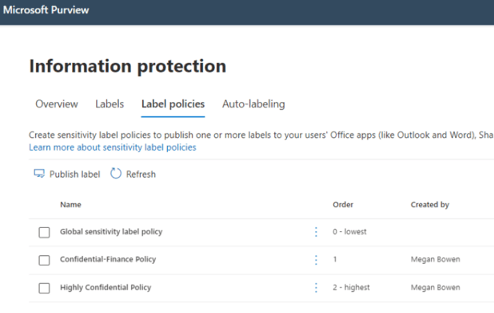
Creating labels will not have any effect on the files or the emails unless the label is published under a policy that targets chosen locations or all locations.
Auto-labeling Policies Tab
Similar to the previous tab, here we can set the second type of label policies: auto-labelling policies. As the name indicates, these policies will not require the end-users’ action to label the files.
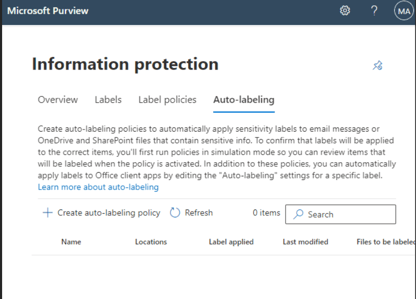
It will need a specific list of Sensitive Info Types to look for in each file, and when a match is detected, a label will be applied accordingly.
After this quick presentation of the Information Protection section, let’s dive into practical steps and test our features.
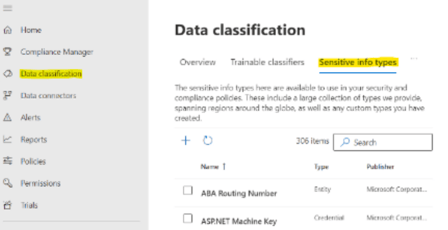
Sensitive Info Types: Built-In & Custom
As we saw in our Introduction Blog, Sensitive Info Types are used in:
Built-In SITs
Built-In SITs are easy to use and more than 300 are already available by Microsoft for immediate use and cover most of the PII worldwide.
Sensitive information type entity definitions by Microsoft.
It is also possible to customize the built-in SITs. For more details head here: Customize a built-in sensitive information type.
How to Create A Custom SIT
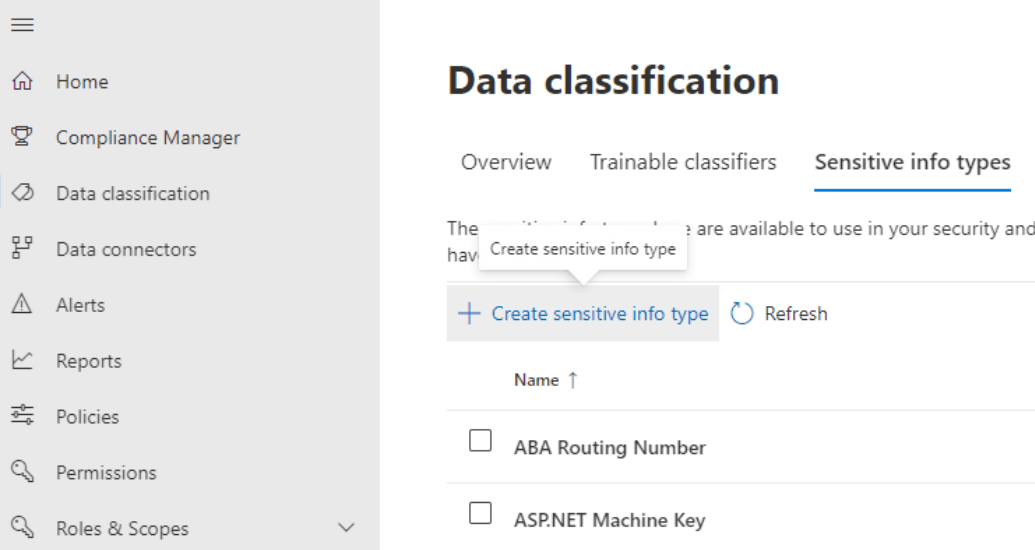
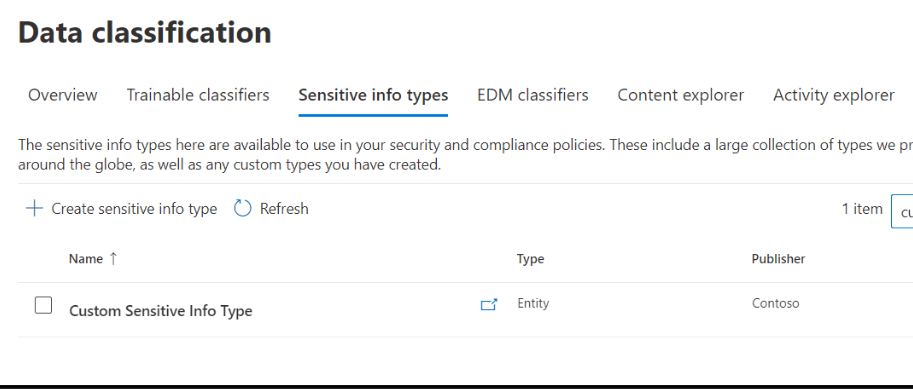
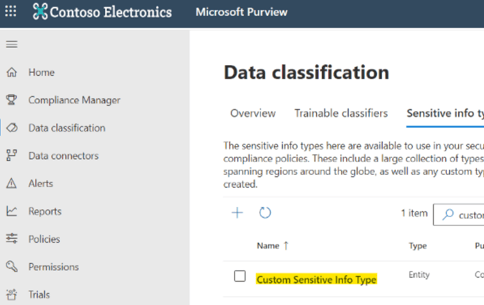
To create your own Sensitive Info Types, from the Microsoft Compliance portal click on Data Classification on the left pane, and then the Sensitive Info Types tab.
Before jumping right into, let us share with you this important Microsoft Disclaimer on this topic:
“Microsoft Support can't help you create content-matching definitions.
For custom content-matching development, testing, and debugging, you'll need to use your own internal IT resources, or use consulting services, such as Microsoft Consulting Services (MCS). Microsoft Support engineers can provide limited support for this feature, but they can't guarantee that custom content-matching suggestions will fully meet your needs.
MCS can provide regular expressions for testing purposes. They can also provide assistance in troubleshooting an existing RegEx pattern that's not working as expected with a single specific content example.
See Potential validation issues to be aware of in this article.
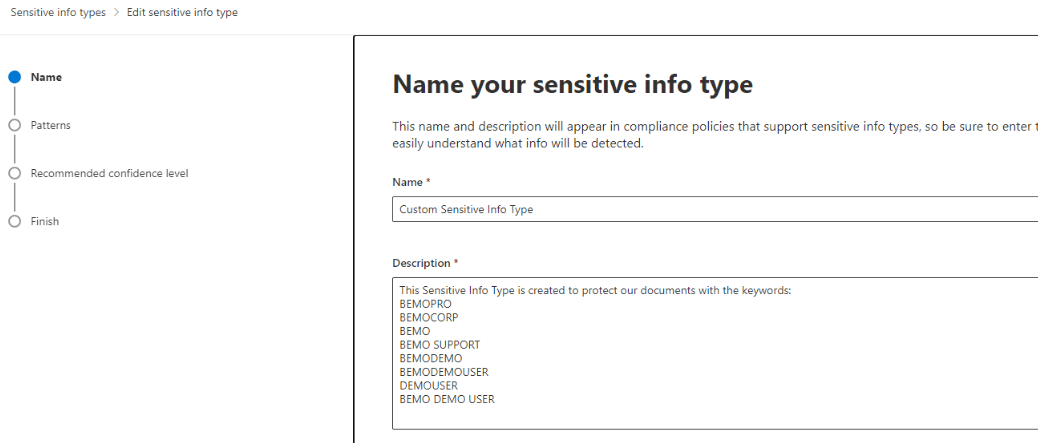
In our example, we will create a few documents containing the keywords shown above and configure an auto-labeling policy that will encrypt files containing these keywords.
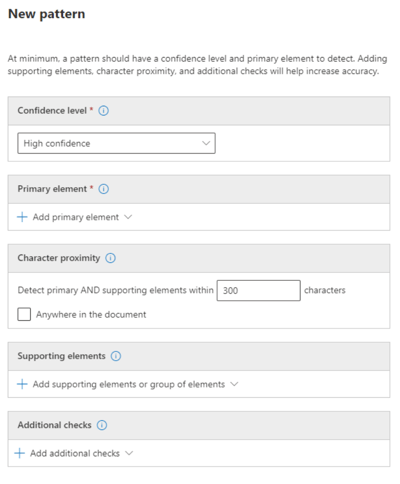
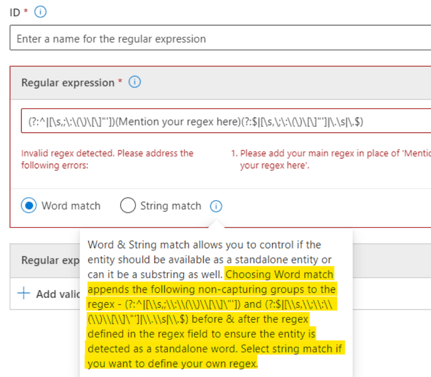
The first step of our Custom SIT is to define a recognition pattern. Each pattern contains the following setting options:
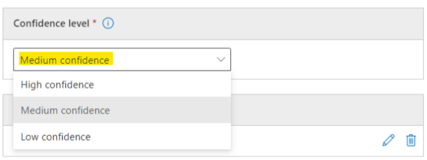
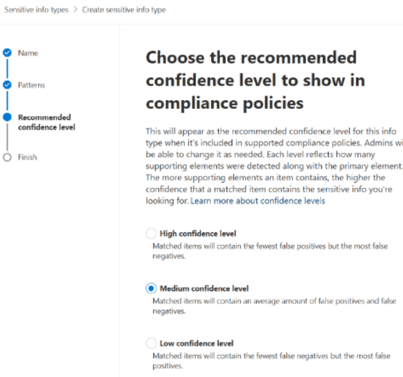
- Confidence level (required)
- low confidence: Matched items will contain the fewest false negatives but the most false positives. Low confidence returns all low, medium, and high confidence matches. The low confidence level has a value of 65.
- medium confidence: Matched items will contain an average amount of false positives and false negatives. Medium confidence returns all medium, and high confidence matches. The medium confidence level has a value of 75.
- high confidence: Matched items will contain the fewest false positives but the most false negatives. High confidence only returns high confidence matches and has a value of 85.
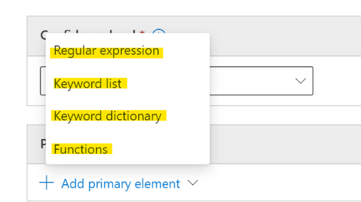
- Primary element (required)
- The main element that the sensitive information type is looking for. It can be a regular expression with or without a checksum validation, a keyword list, a keyword dictionary, or a function.
- Character proximity
- Number of characters between primary and supporting element.
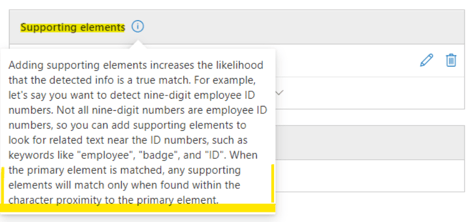
- Supporting elements
- Elements that act as supporting evidence that help in increasing the confidence of the match. For example, keyword "SSN" in proximity to an SSN number. It can be a regular expression with or without a checksum validation, keyword list, keyword dictionary.
- Additional checks
- To further refine the evaluation and detection of matching items, you can include additional checks that include or exclude specific text and/or patterns. For example, you can exclude specific 16-digit numbers that might incorrectly be identified as a credit card number.”
Let’s create our first pattern:
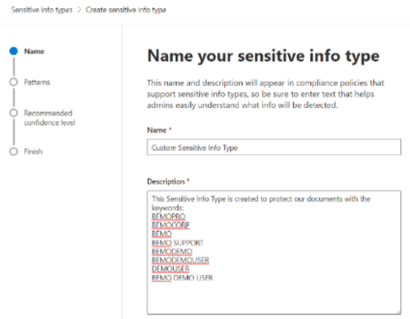
1. Click on Create sensitive info type.
2. Give it a name and a description.
3. Click next to get to the Pattern creation page:
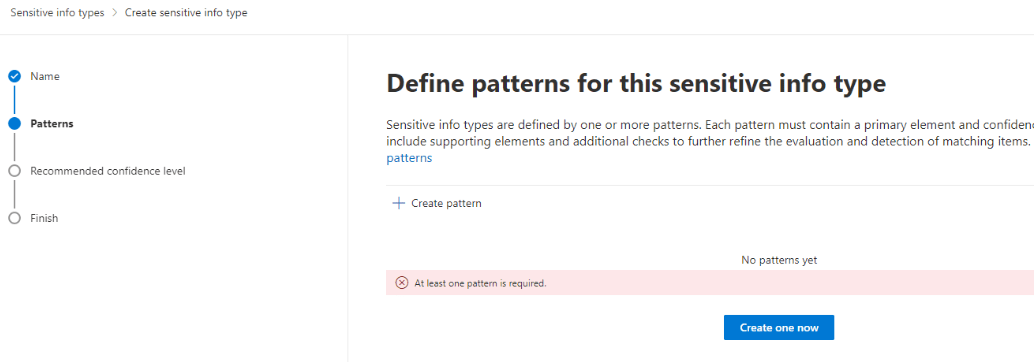
4. Click on Create pattern:
5. In our case it is already done, and we will explain below how. Here we can search for our Custom Sensitive Info Type:
6. Here are the details of created pattern:
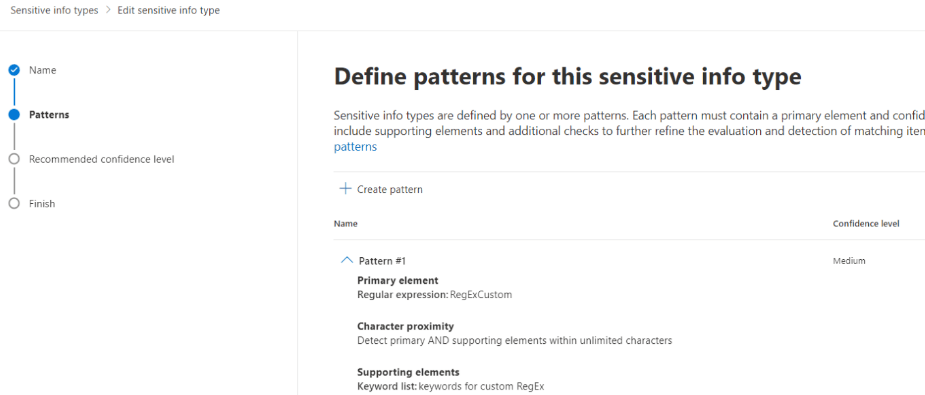
7. When we click it, we can explore the details of the configuration and the matched items in our data:
8. Let’s get into the configuration details of our pattern now:
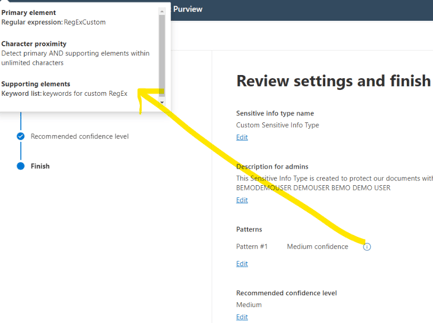
Confidence level (required):
We will choose Medium confidence for now, this means that will consider our data matches in our content as being sometimes false positive. In other words, when we detect BEMO in our documents, we don’t want the detection to mean that that we have mostly false negatives and fewer false positives, rather an equal average amount of both.
Primary element (required):
4 options are available:
-
Regular Expression
-
A regular expression is a pattern that the regular expression engine attempts to match in input text.
-
A pattern consists of one or more-character literals, operators, or constructs. For a brief introduction, see .NET Regular Expressions.
-
This third-party tool is useful for validating and testing your RegEx pattern: https://regex101.com/
-
-
Keyword List
-
Keyword lists identify the words and phrases you want this info type to detect. For example, the keyword list to identify Netherlands VAT numbers is 'VAT number, vat no, vat number, VAT#.
-
-
Keyword Dictionary
-
Ideal for generic content, specific to an organization or an industry
-
supports any language, with much larger input capacity (1 Mb after compression
-
you can create up to 50 keyword dictionary-based SITs
-
check this Microsoft Doc to find out how many keyword dictionaries do you currently use (PowerShell)
-
Steps to create your own keyword dictionary from the Microsoft Purview compliance portal:
-
Connect to the Microsoft Purview compliance portal.
-
Connect to the Microsoft Purview compliance portal.
-
Navigate to Classifications > Sensitive info types.
-
Select Create and enter a Name and Description for your sensitive info type, then select Next
-
Select Add an element, then select Dictionary (Large keywords) in the Detect content containing drop-down list.
-
Select Add a dictionary
-
Under the Search control, select You can create new keyword dictionaries here.
-
Enter a Name for your custom dictionary.
-
Select Import, and select either From text or From csv depending on your keyword file type.
-
In the file dialog, select the keyword file from your local PC or network file share, then select Open.
-
Select Save, then select your custom dictionary from the Keyword dictionaries list.
-
Select Add, then select Next.
-
Review and finalize your sensitive info type selections, then select Finish.
-
-
Steps to create your own keyword dictionary by importing a file using PowerShell
-
-
Functions
-
Functions are used to find text that's formatted in a specific way.
-
For example, 'func_credit_card' looks for 14 to 16 digit credit card numbers that can be formatted or unformatted and which must pass the Luhn test.
-
You can find all the Sensitive Information Type Functions definitions here.
-
Source: Microsoft Docs
We will use RegEx as our Primary element and keyword list later on as our Supporting elements in this blog.
Our RegEx
The RegEx might look confusing at first sight, but Microsoft makes it easy to use when you select the option:
So, we only need to add our expression where it is indicated:
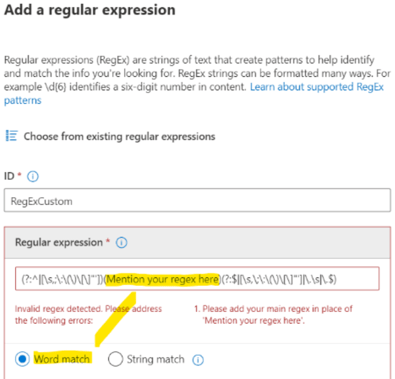
BEMO will be the most important word we are looking for. We will keep our RegEx simple and add the other variations of BEMO appearing in our documents as keyword list in the Support elements.
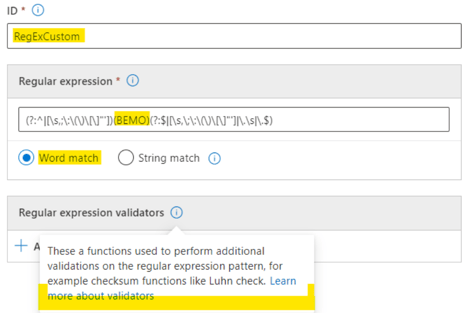
Please note: We will not use validators in this case (see the below screenshot for more information). We will come back to these in the coming blog about Data Classification and Trainable Classifiers.
We chose this to make the detection focused on BEMO. We could use the keyword list as well as the Primary element, and the RegEx as a supporting element too.
Note: In the end, each case would have more or less optimal configurations so testing and tweaking are part of it, so feel free to experiment at this stage and see what works best for you.
Maybe entering a full keyword dictionary would fit better your need because you might need to cover hundreds of words and you prefer to upload a TXT or a CSV file as a dictionary.
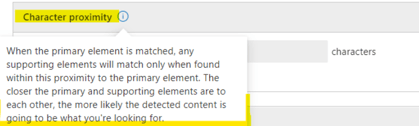
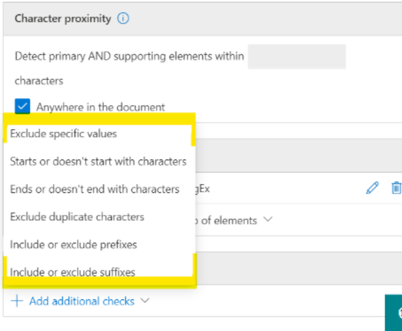
Character Proximity
This parameter defines how far from the Primary element the supporting elements should be considered.–
For example, if my Primary is “RegEx BEMO” and the Supporting element in the document is 10 pages further, I can make sure that the detection will associate both together or vice-versa.
So at this point, we define the number of words, surrounding the Primary element that is the maximum allowed for us to make an association and consider this a match.
In our case, we chose the whole document. Again, this is to keep it simple.
Supporting Elements (our Keyword List)
When you select this option, you will simply enter the case insensitive and sensitive words exactly as you would write them to trigger the encryption.
Here is our keyword list supporting elements for our custom RegEx:
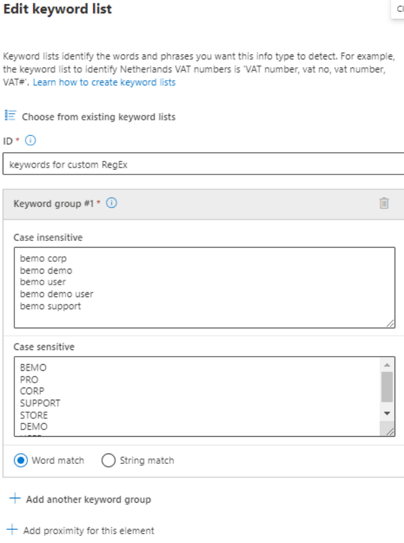
We can create multiple keyword list groups if needed with endless iterations but for our demo here, we will keep it brief.
Additional Checks
Once done, you will now see your first Pattern created and you are ready to go to the next step.

9. The next page is the Confidence level, we chose Medium for our SIT:
10. Click Next.
11. Save and create your SIT.
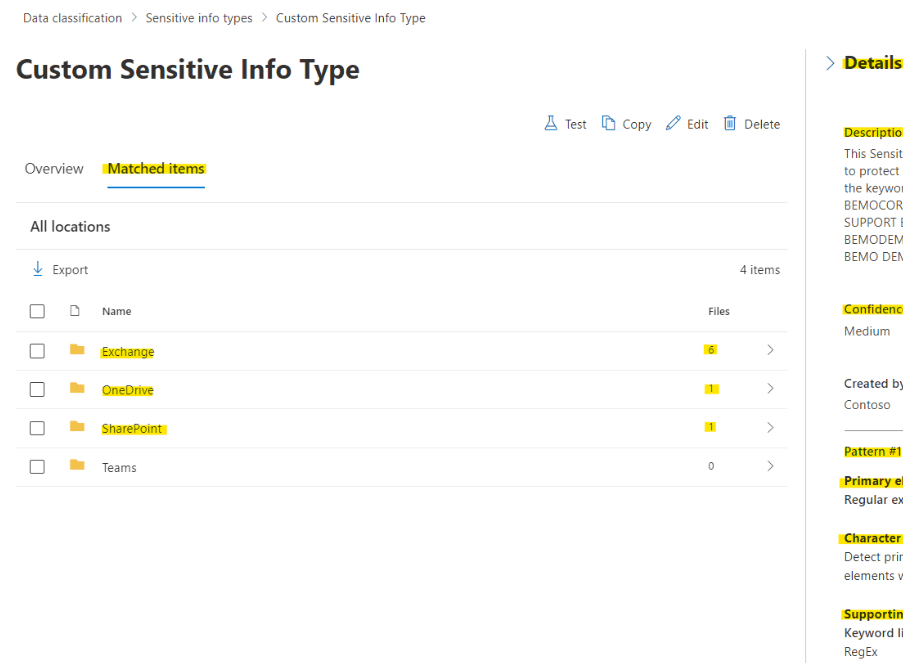
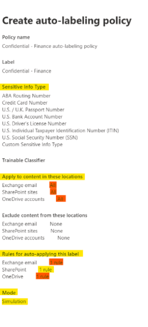
This is the summary of our custom SIT
And we can search now for it in our SIT list:
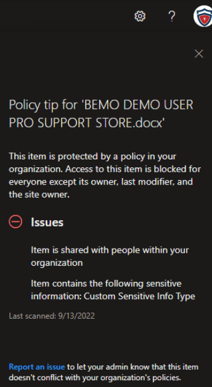
Example of DLP detection of our custom SIT:
Part 3: Microsoft Purview Sensitivity Labels Use Case Scenarios
Scenario 1: Protect Data Internally & Separate Data Access
Considerations
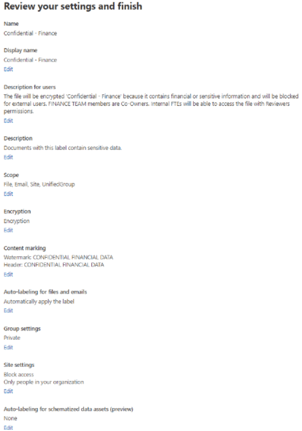
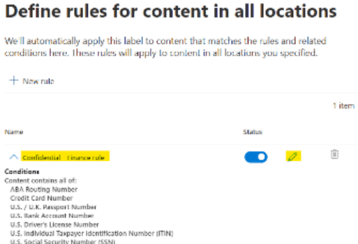
In this scenario, we are trying to protect the Teams site 'Finance Team' with an exclusive label allowing only team members to access the site’s content with full rights. The Team is Internal Only so an external user will be invited, and files won’t be shared externally. However, the Finance Team needs to be able to share files with other internal employees that are not part of their team but that they need to work with on some files or folders. The label name should be Confidential Finance.
Create A Sensitivity Label
In the considerations, we understand that we need to both restrict internal and external access to the files stored in the Finance Team folders.
The key point is that we want the Finance Team to be able to occasionally share files with Internal users while making sure no one external user would ever be able to open the files, or the messages labelled Confidential Finance.
In this example, we can understand the 2 layers available for us when using labels: the File locations & the files themselves.
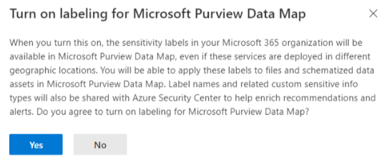
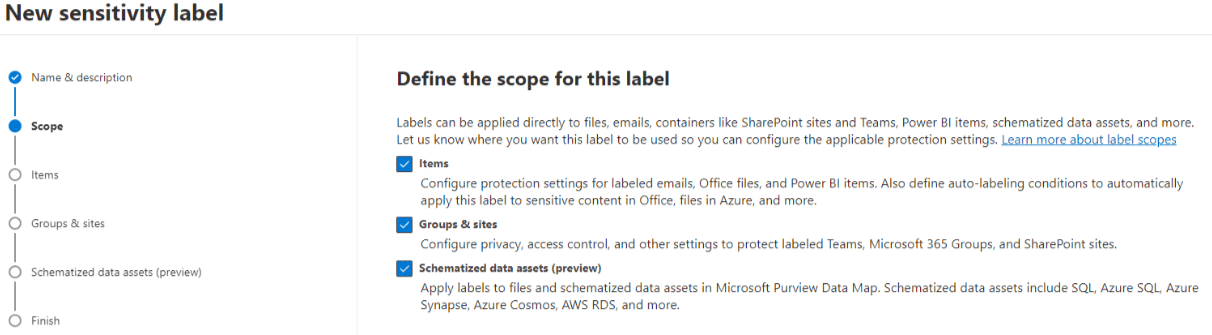
In Fact, while creating a Sensitivity Label you will be able to choose if this label can be applied to Items, Groups & Sites, or Schematized Data Assets (preview).
Let's begin with our team.
The best practice is to use or create a group that we would call 'ALL USERS' or 'FTEs' for example and create other groups when needed for administration management purposes: Finance, Marketing, Sales, Support etc.
So before setting up our label, let’s check the Finance Team properties in the admin center admin.microsoft.com
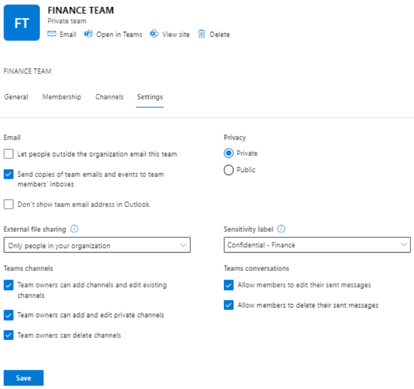
We will block the Team from being accessed by any type of external guest (new or existing) by allowing only Internal users to use both the Teams sharing setting and the Sensitivity Label Access Control.
There is also a setting in the Sensitivity Label that needs to be configured accordingly, we will get to this later, but here is the screen.
Now let's discuss the Files protection.
On the items themselves, we have 2 approaches possible:
Approach Option One: Create two sets of permissions in one label.
The first set of permissions will be Co-Owner for all 'FINANCE Team' members and the second will be Reviewer for the other 'FTEs' in the company.
This means that once an internal user is invited to the 'FINANCE Team', they will have Reviewer permissions on the files without any label change.
But because both permission sets would be within the same label and policy, all the company will see the Confidential Finance label, and sometimes this creates confusion at first (why does the label show up for me if I am not part of that team?).
Approach Option Two: Create Two Labels.
One with Co-Owner permissions assigned to the 'FINANCE Team' members, the second label will be Reviewer and will be pushed via policy to both 'FTEs' and 'FINANCE Team'.
This means that when the 'FINANCE Team' wants to share the item with Internal users, they need to change the label from 'FINANCE Team' to 'FTEs'. They can send the file by sharing a link or by inviting the Internal user to the Team site (again, after changing the file’s label).
This approach requires more work while implementing but is more organized, secure, and restrictive.
It also avoids teaching everyone about every single label available in the company by putting the ownness on the specific Teams protected (in this example it’s ‘FINANCE Team’) to change the Items' labels before sharing them.
Setting Up the Sensitivity Label
For simplicity’s sake, in this blog we will use only one label to work on all the scenarios, but as said earlier you can setup a label per permission set and have a policy for each label or subgroup of labels to be deployed across the board.
Name & Description
For each label, we have a Name, Description for Users (policy tip), and Description for Admins (optional). 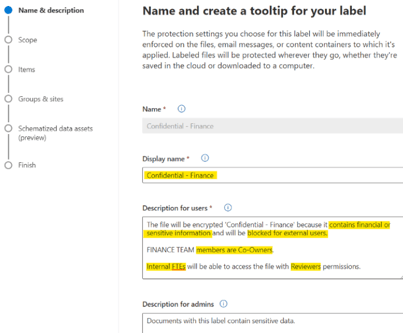
Scope
On the Scope settings page, check both Items as well as Group Sites. 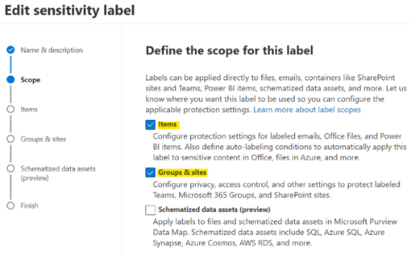
Items
On the Items settings page, check both Encrypt items as well as Mark items. 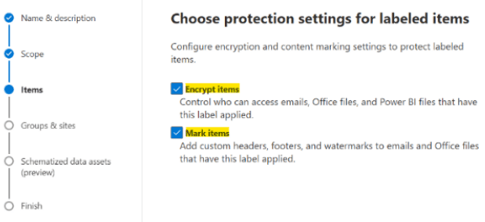
We have 2 subpages under Items: Encryption & Marking.
Encryption
Here configure the permissions and encryption settings.

We will assign the permissions required in our scenario, and also block offline access and make sure the content never expires:
-
Assign permissions now or let users decide?
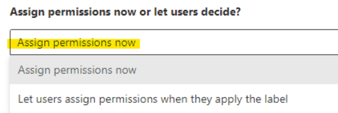
In our case we want to control the access of our files so we cannot allow the users to decide.
-
User access to content expires. If you want to limit how long users can access content with this label, specify a date or number of days at which access should expire. After the time specified, users will not be able to open files that have this label.
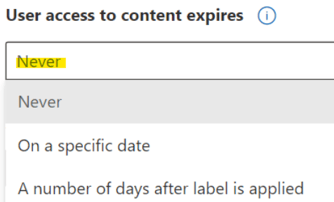
There are no requirements to control the content expiration in our scenario, we will set feature to Never.
-
allow offline access
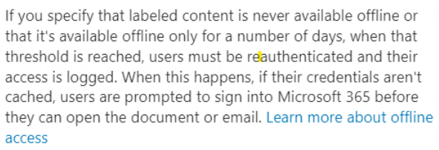
This feature will allow us to make sure that the users accessing the content are authenticating and are connected to the internet.
In some use cases, we might want to allow users to have an offline access, but this is not required in our scenario. We set it to Never.
-
Assign permissions to specific users and groups

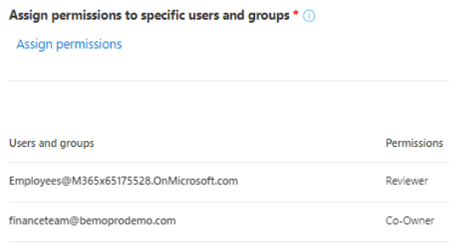
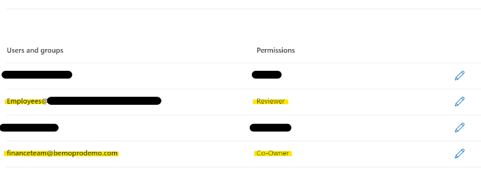
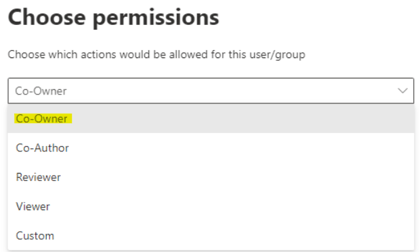
To respond to the permissions laid out in the considerations, we will give the internal employees group Reviewer permissions and the finance team will have Co-Owner permissions.
-
You can create your own set of permissions by clicking on Assign permissions to open the Assign permissions pane.
-
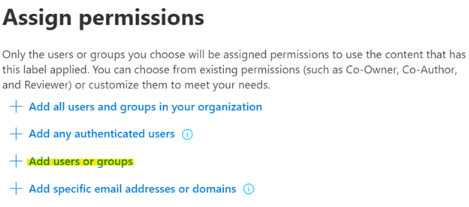
To create the permissions sets for this scenario we used the option Add users or groups. We are using the All Employees & Finance Team groups so we can give different levels of access between the different users as required by the scenario.
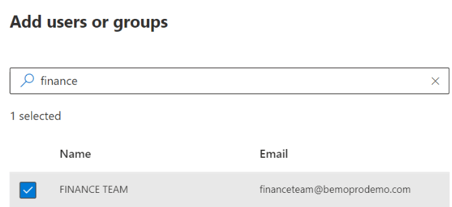
-
The groups search pane opens, we select our Finance Team.
-
Now the Finance Team is added, and we can click on Choose permissions.
-
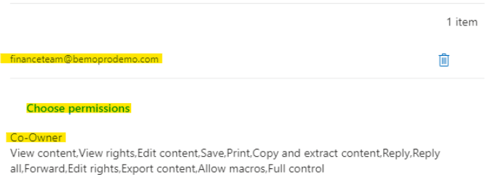
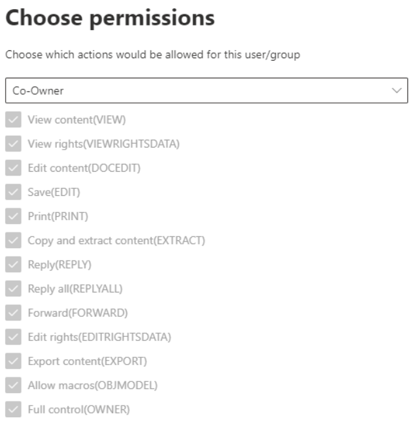
Here we configure Co-Owner permissions by choosing in the drop-down menu, we want Finance Team members to have all rights on the files.
Let’s save our settings and now we have configured the Finance Team permissions on this label. Wherever this label is applied, the members of this team will be Co-Owner of the content.
We can repeat the steps 1 to 5 for the ‘All-Employees’ group by this time with assign them Reviewer permissions.
Auto-labelling for files and emails
1. Enable the feature.

2. On the same subpage, we will add a list of the most common PII (Personally Identified Information) in the US, and search for our Custom Sensitive Info Type created earlier. 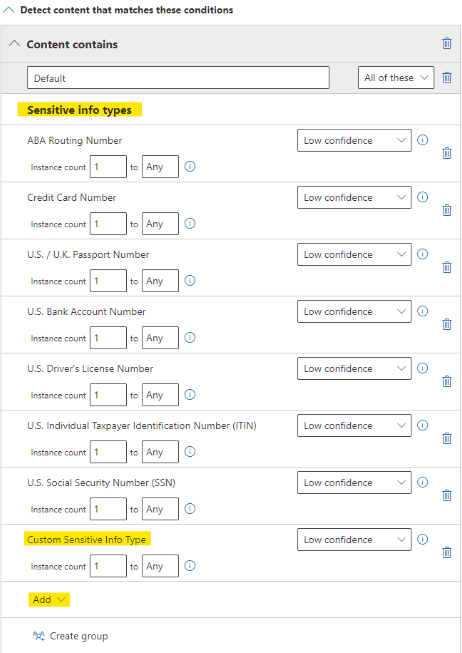
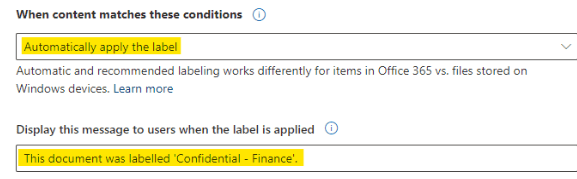
3. On the same subpage, under When content matches these conditions, select Automatically apply the label. Then add a tip to inform the users.
Groups & Sites
The next page is Groups & sites, check both Privacy and external user access settings and External sharing and Conditional Access settings. 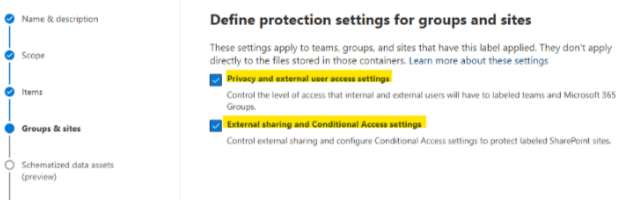
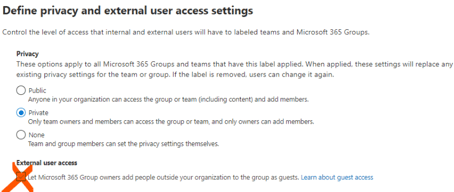
Privacy & external user access
Now we can configure our settings for each subpage. Because we want our group to be limited to its members, we will choose the Private option.
We don't want any external user to be able to access this group's files: make sure to leave the option External user access unselected. 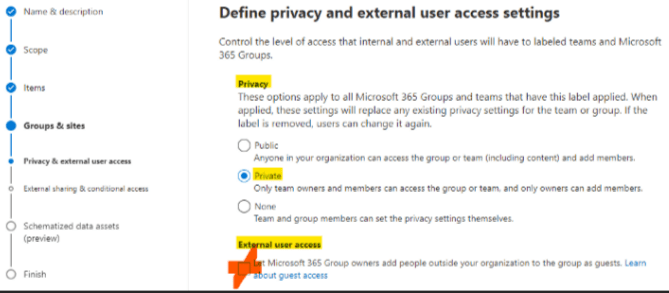
External sharing & conditional access
On the next subpage, enable both features by checking the boxes Control external sharing from labelled SharePoint sites & Use Azure AD Conditional Access to protect labelled SharePoint sites.
To fulfil our consideration, we will choose the options Only people in your organization, and Block access from unmanaged devices. 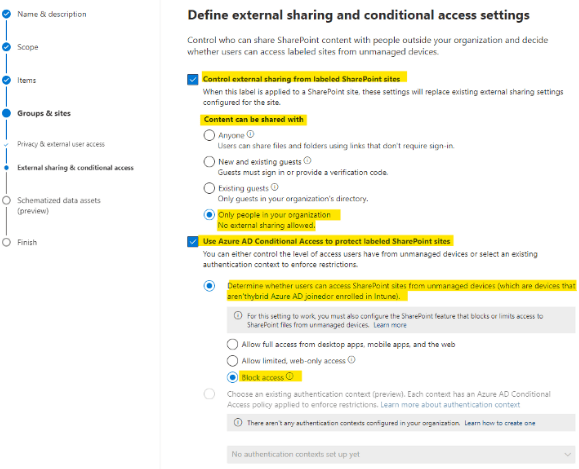
The next step will not apply to our scenario. 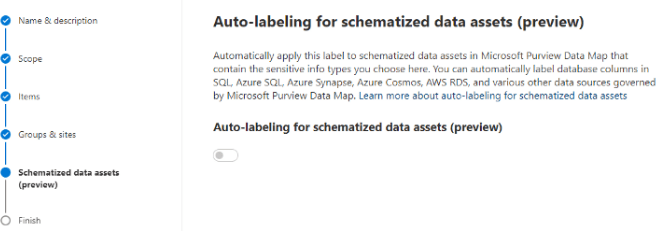
On the last page we can review and validate our overall label configuration before creating it.
Create & Assign a Sensitivity Label Policy:
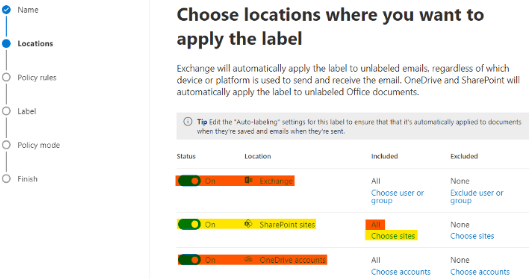
In our Policy, we will publish the label only to the Finance Team site without impacting the Finance Team members' OneDrive or Email items.
Below in orange are the settings we need to review.
The rule must not be applied to Emails or OneDrive, and only one site should be targeted, not all of them.
-
Click review Policy.
-
Enter a Policy Name.
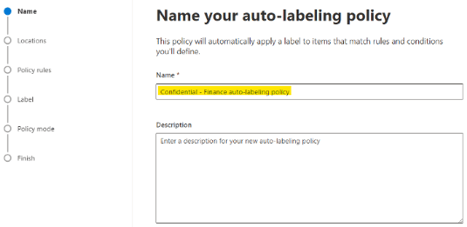
-
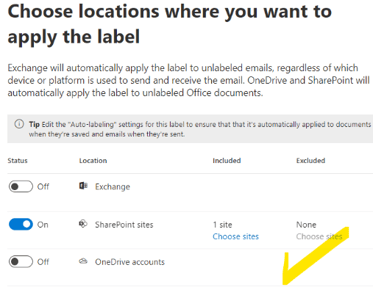
On the next page, Locations, switch the Status for Exchange and OneDrive Accounts to Off.
-
Now we can select our site by clicking on Choose sites, enter the site's URL, then validate with the + button.
-
The site will appear below, select it, and save.

-
Now we have only the Finance Team site covered by the policy. Click Next.
-
On the Policy rules settings page, chose the Common rules option and click Next.
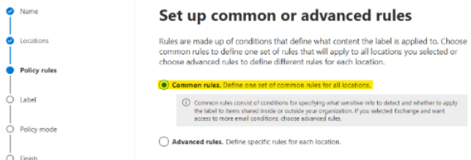
-
Click on the pen icon and give a name to your rule that reflects its usage. The Policy rule is the set of conditions that will trigger the Labelling or the files in the Finance Team site.
-
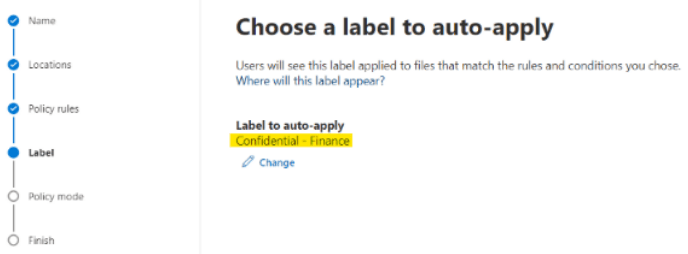
On the next page, make sure that the correct label is selected for deployment.
-
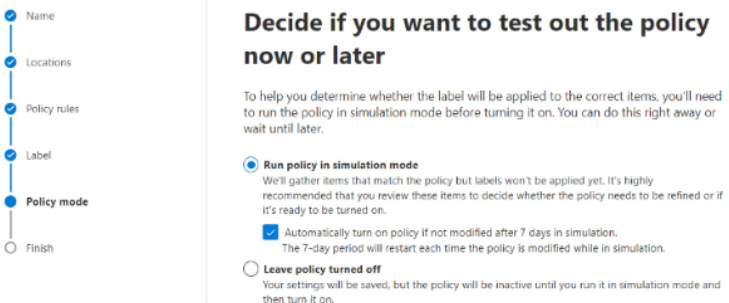
The Policy mode settings page allows us to choose deployment modes. Always begin by running a Simulation.
-
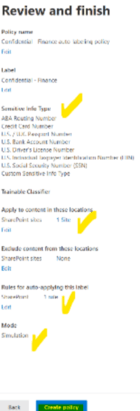
We can now review and finish our policy.
Scenario 2: Protect Data While collaborating with External Collaborators
Considerations:
Using the same setup as in Scenario 1, allow external sharing of the Finance Teams Site with External Collaborators from the partner company bemopro.com.
They will need to edit the files, print, and copy them when needed.
In addition, there will be users from other organizations accessing the data with View-Only permissions once Authenticated.
Use an access package to allow bemopro.com users to be members of the Finance Team.
Create a Sensitivity Label:
To answer the requirements of the second scenario, using our first setup we need to add 2 new sets of permissions.
One for bemopro.com partners, which will be Co-Authors and a second set of permission with Viewer permissions for any other Authenticated User.
In the Label settings go to the Encryption page and click on Assign permissions. 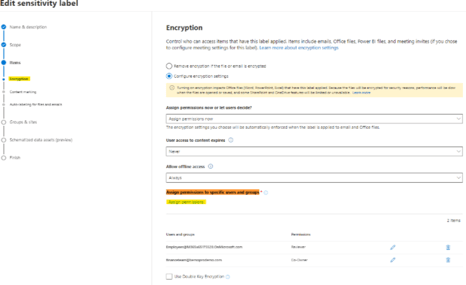
This pane will open on the right side: 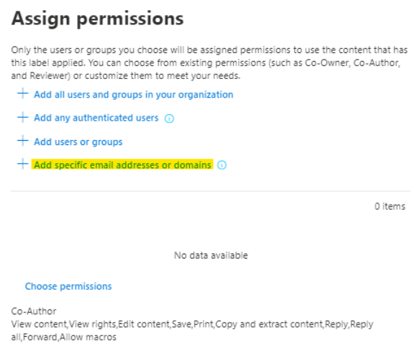
Click on + Add specific email addresses or domains and enter the domain name bemopro.com.
Click on Choose permissions > Co-Author and confirm that the set of permissions assigned allows bemopro.com users to fulfil the requirements in our considerations’ sections. 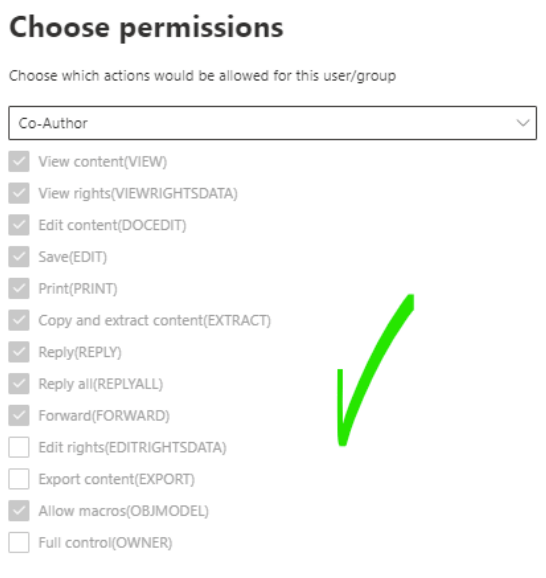
Click Save at the bottom and then Add (next to the domain name). 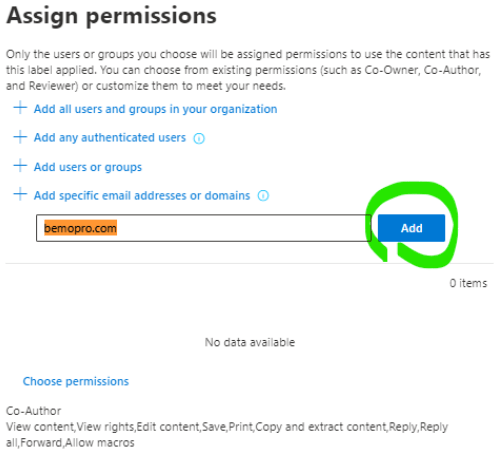
You will see the domain being added to the list of permissions, click Save one more time. 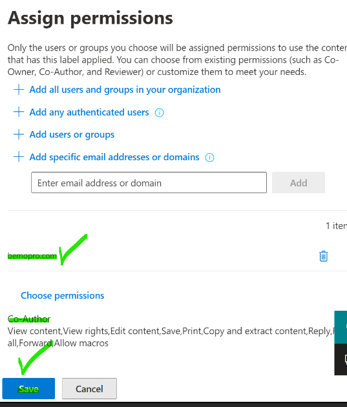
You can now see the bemopro.com entry in the Permissions list of your label: 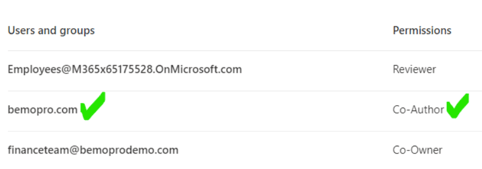
On the same page, with similar steps, we will now add the View-Only permissions for any other external user besides bemopro.com.
Click Assign permissions > Add any authenticated users > Choose permissions > in the drop-down menu select Viewer and save your configuration. 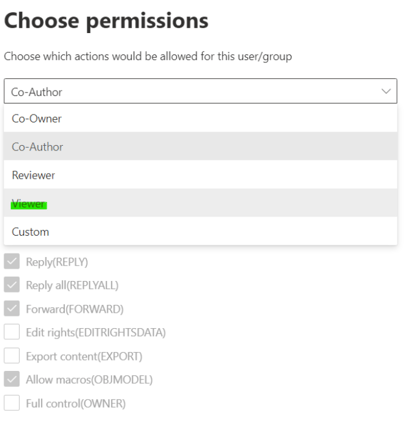
And we can confirm that these permissions also fulfil the protection requirements. 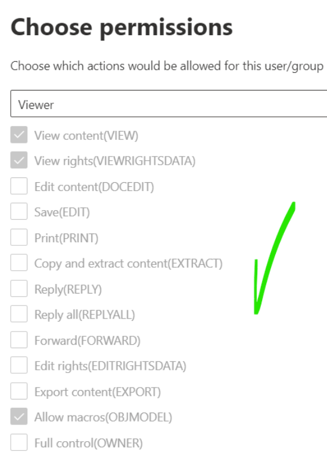
Now our label permissions are ready. Click Next until you get to the label section Groups & Sites. 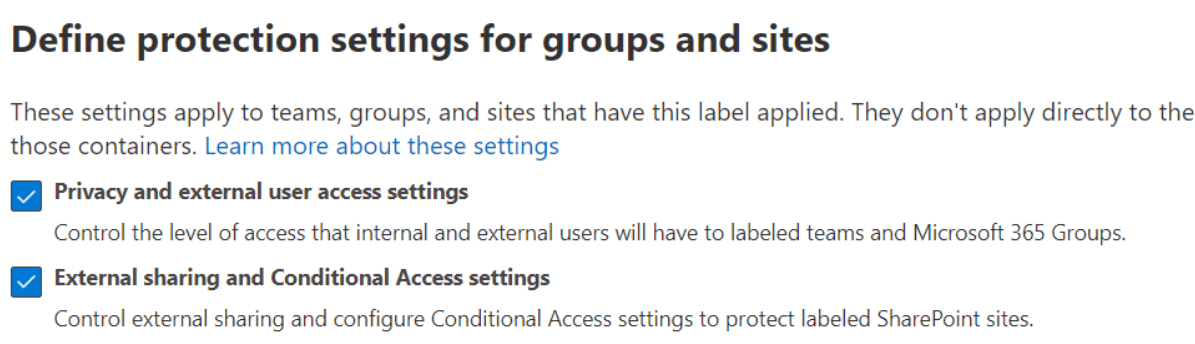
Let’s begin with Privacy & external user access. Under Privacy we will not make changes, but for the External user access parameter we need to enable Let Microsoft Group owners add people outside your organization to the group as guests. 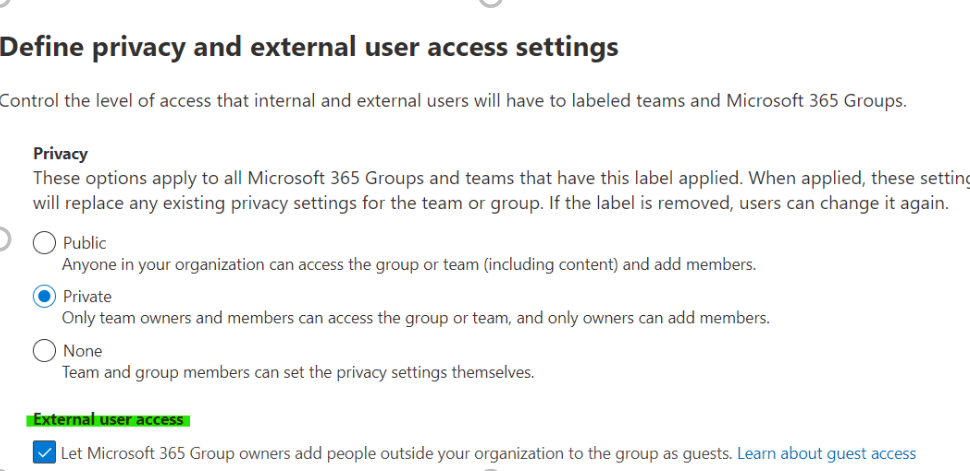
For this change to make sense we also need to edit the Team’s setting External file sharing in the Admin Centre. 
In addition, you can also enable the Email feature Let people outside the organization email this team if that’s needed.
Now let’s go back to our label’s settings and click Next . 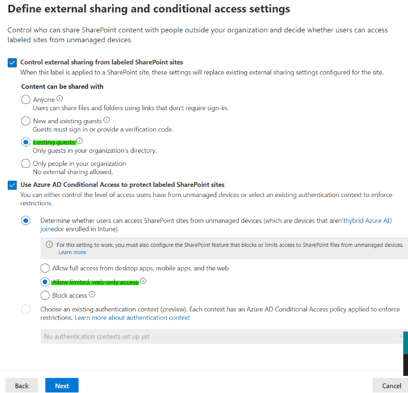
Changes need to be made here:
Control external sharing from labelled SharePoint sites should be changed to New & Existing guests instead of Only people in your organization.
Use Azure AD Conditional Access to protect labelled SharePoint sites should be changed to Allow limited, web-only access instead of Block Access. 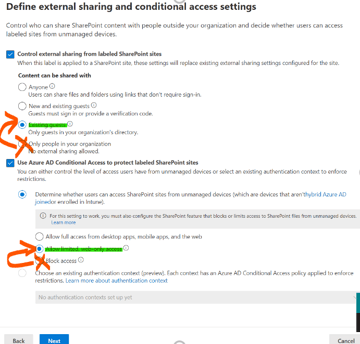
Click Next & Save Label and once the update is completed click Done. 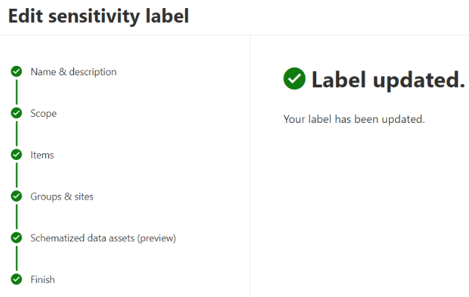
Now, identically to the previous scenario we can create a label policy to deploy our label.
At this point we are ready to test our configuration settings, which is what we will be showing you in our coming up video on this topic. Stay tuned!
Hopefully you now understand a little but more about Sensitivity labels & policies and how important they can be for companies to use.
As always, if you have any more questions about Sensitivity Labels & Policies, please reach out.
We've got more resources for you to become a cyber-pro.

Leave us a comment!