Difficulty level: Moderate | Time Investment: 45-60 min
Summary: Self-Service Password Reset (SSPR) for Office 365 and Azure is a great solution created by Microsoft to enable users to change and reset their passwords by themselves, saving IT a lot of time. Self-Service Password Reset allows users to both change their existing passwords or their forgotten ones. This feature works both with Azure Active Directory and On-Premises Active Directory synced using AD Connect. Follow this article to know how to set it up yourself!
These instructions are separated into two sections
- Instructions for setting up Self-Service Password Reset for companies using Azure Active Directory
- Instructions for setting up Self-Service Password Reset for companies using On-Premises Active Directory with AD Connect
Instructions for setting up Self-Service Password Reset for companies using Azure Active Directory
Step 1 - Create a Security group in Office 365. To do this, go to https://portal.office.com and sign-in with your office 365 Global Administrator account > Select Admin Center.

Step 2 - On the left-Navigation pane, select Groups > Groups
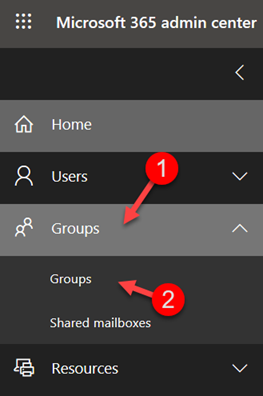
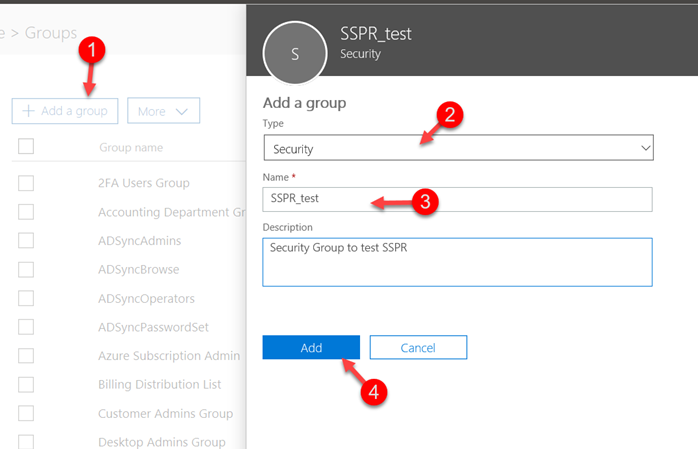
Step 3 - Click on Add a Group. > Choose Security Group from the type drop-down > Give the group a name. Click Add.
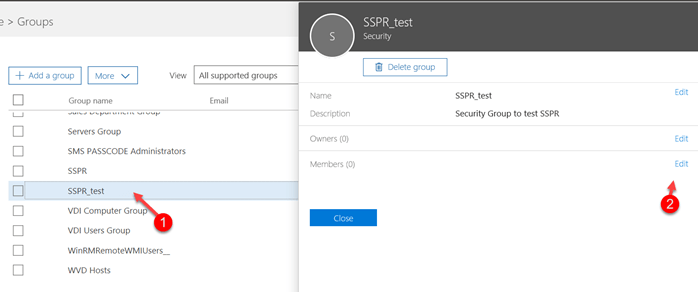
Step 4 - Once the security group is created, navigate to the group and click Edit, next to members to add the user as the member of this security group.
Step 5 - Once you add the user as a member of the security group, then from the left navigation pane, expand Admin Centers and click on Azure Active Directory.
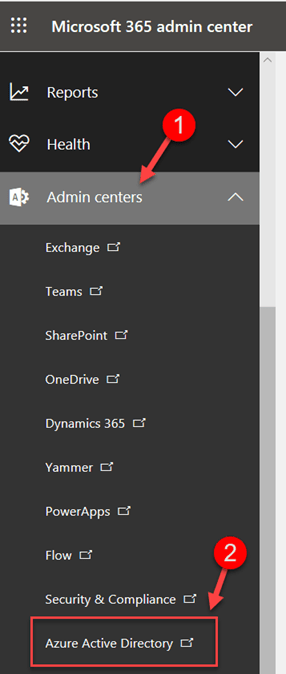
Step 6 - From Azure Active Directory Admin Center, choose Azure Active directory from the left menu.
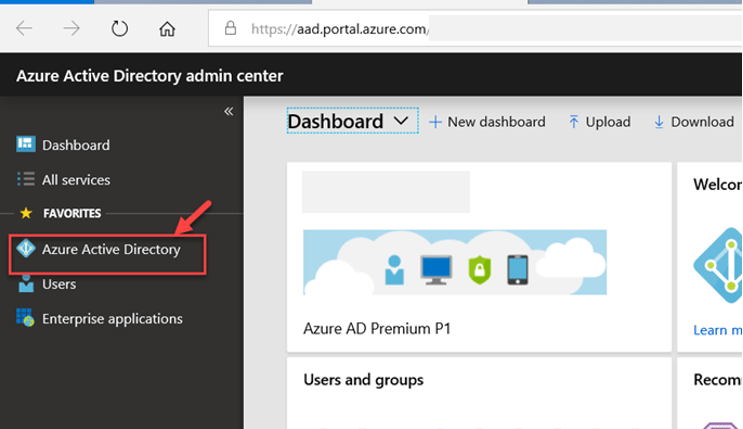
Step 7 - From the Dashboard and option menu in the middle, click on Password Reset.

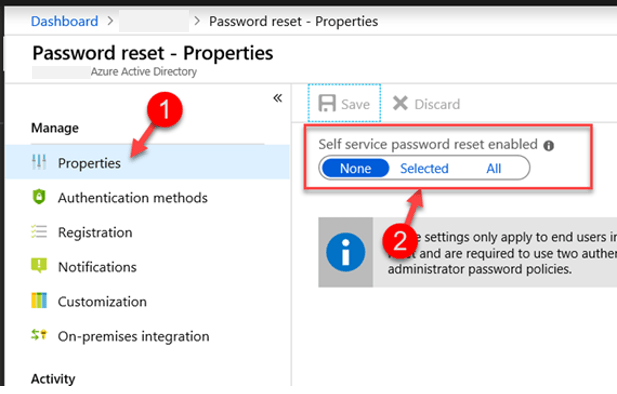
Step 8 - In the Password Reset properties page, choose Properties and select Selected to select a security group. You can also choose All if you want to enable SSPR for everyone.
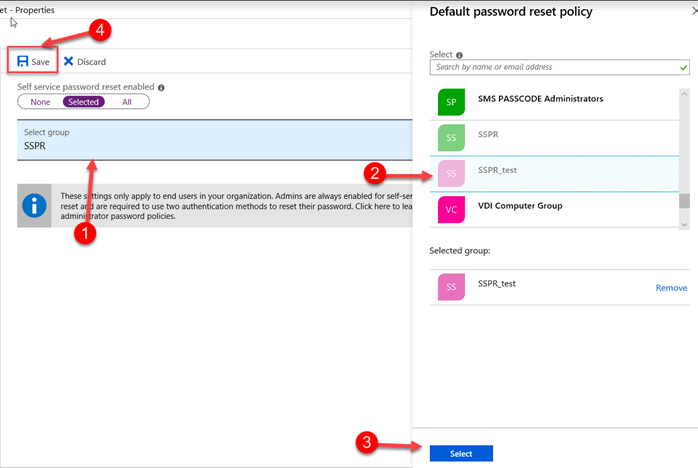
Step 9 - Click on the group, then find the Select a Group desired security group from the list and click on select and then finally click on Save. Once saved, Self-Service Password Reset has been enabled for the users in the selected security group in your Office 365/Azure AD tenant, and you're done!

Instructions for setting up Self-Service Password Reset for companies using On-Premises Active Directory with AD Connect
To use password write-back, your Office 365 tenant must have one of the following licenses assigned on your tenant:
- Azure AD Premium P1
- Azure AD Premium P2
- Enterprise Mobility + Security E3 or A3
- Enterprise Mobility + Security E5 or A5
- Microsoft 365 E3 or A3
- Microsoft 365 E5 or A5
- Microsoft 365 F1
- Microsoft 365 Business Premium (formerly Microsoft 365 Business)
Configure Password Write-Back
After configuring Azure AD Connect in your environment by using either the Express or Custom settings and making sure that your Office 365 tenant meets the licensing requirements for the Password Write-back, follow the steps below to enable Password Write back from the Azure AD Connect tool:
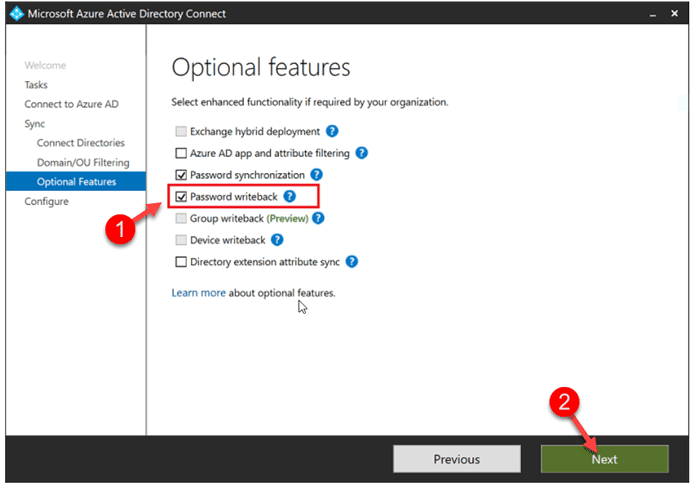
- Login to your Azure AD Connect server and start the Azure AD Connect configuration wizard.
- On the Welcome page, select Configure.
- On the Additional tasks page, select Customize synchronization options, and then select Next.
- On the Connect to Azure AD page, enter a global administrator credential, and then select Next.
- On the Connect directories and Domain/OU filtering pages, select Next.
- On the Optional features page, select the box next to Password writeback and select Next.
- On the Ready to configure page, select Configure and wait for the process to finish.
- When you see the configuration finish, select Exit.
Post-configuring the SSPR and password write-back, your users, whether in the cloud or synced with active directory can change or reset their passwords by themselves from the Office 365 portal.
What is the end user experience when users are enabled to SSPR?
- Once Self-Service Password Reset is enabled on the user account, the user will go to the Office 365 portal or to Outlook on the Web or any Office 365 service to login with the existing username and password.
- After entering the password, the user will get a prompt saying, Your organization needs more information to keep your account secure. Click Next.
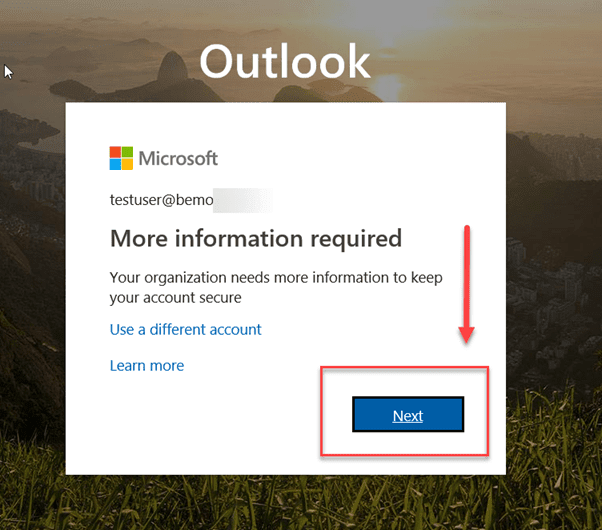
- This screen appears only when the user is signing in for the first time after their account is enabled for SSPR. In this step, the user will have to setup the Authentication Phone and Authentication Email to be able to reset the password in case the user forgets it.
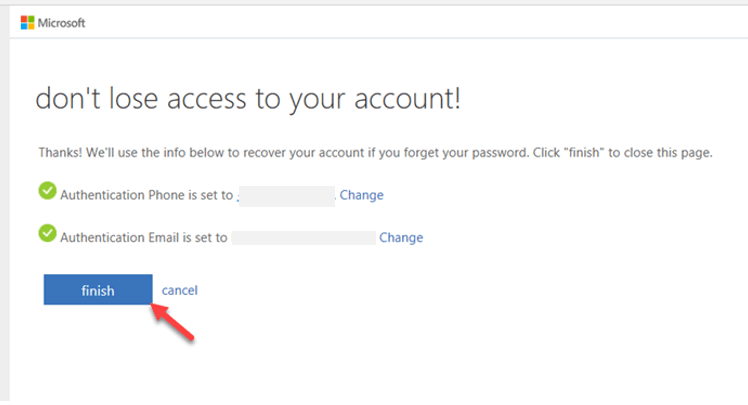
- Click on Set it up now link against each one – Authentication Phone and Authentication email.
- Once the user completes the setup for both the Authentication methods, then click on Finish.
Now the SSPR is all setup and your users can both change their passwords and reset forgotten passwords, whether you're using Active Directory or Azure AD.
Questions? Schedule a meeting with us using the button below:

We've got more resources for you to become a cyber-pro.

Leave us a comment!